Bots and AI
In this tutorial we’ll add bots and a simple AI system to our 2D platformer. In the end we’ll get something like this:
Bot Prefab
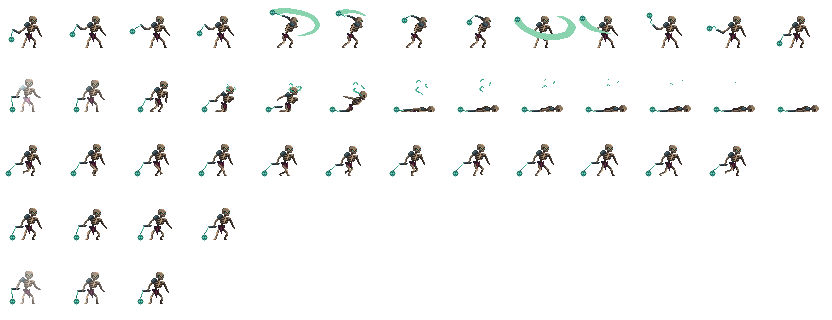
Let’s start by creating a prefab for our bots. Prefab is a separate scene, that can be instantiated at any time in some other scene. It allows us to make reusable and well isolated parts of the game. At first, we need a sprite sheet for the bot, we’ll use this one. It contains attack, hit, death, walk, idle animations. In this tutorial we’ll use only walk and attack animations, other animations will be used in the next tutorial. The sprite sheet looks like this - 13x5 sprites where every sprite is 64x64px:
Save this image in the data/characters folder as skeleton.png. Open the editor and create a new scene, right-click on
the __ROOT__ scene node and click on Replace With -> Physics 2D -> Rigid Body. Rename this node to Skeleton and then
create a Rectangle child node by right-clicking on the Skeleton node and doing Create Child -> 2D -> Rectangle,
select the new rectangle node and set its scale to 2.0, 2.0, 1.0 (default scale of 1.0 is too small and the skeleton
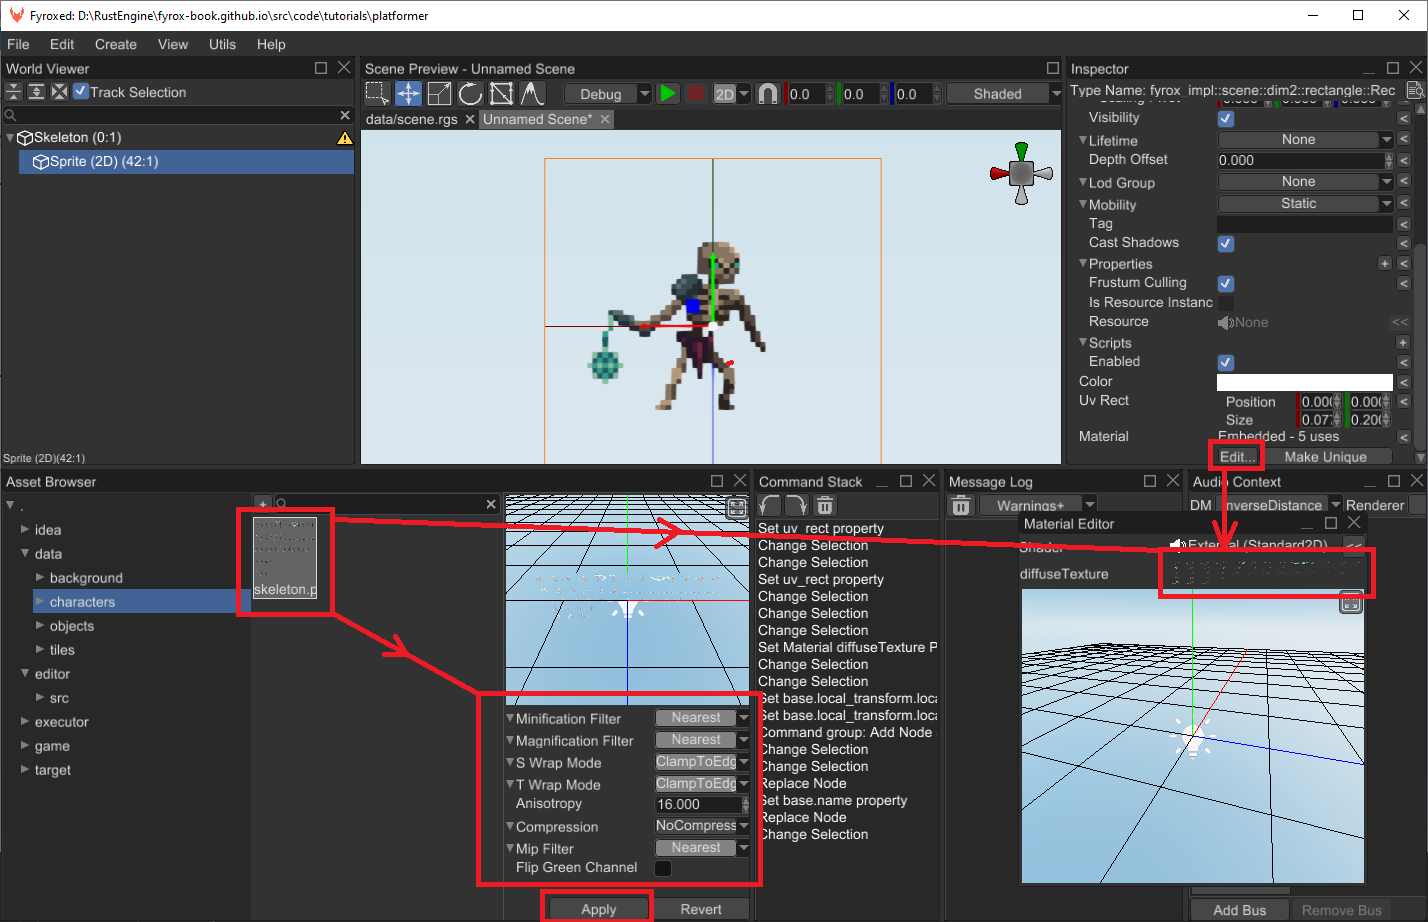
will be half of the height of our player). Now let’s apply a texture to the rectangle, find skeleton.png in the asset
browser, select it, set its properties like on the screenshot below - all filtration modes to Nearest (to make its
pixels sharp, not blurry) and wrapping to Clamp To Edge (to prevent potential seams on the edges). Find the Material
property in the inspector and open the material editor, drag the skeleton.png texture from the asset browser to
diffuseTexture property in the material editor. Set the UV Rect -> Size property to 0.077; 0.2 to select a single
sprite from the sprite sheet, and you should see something similar to this:
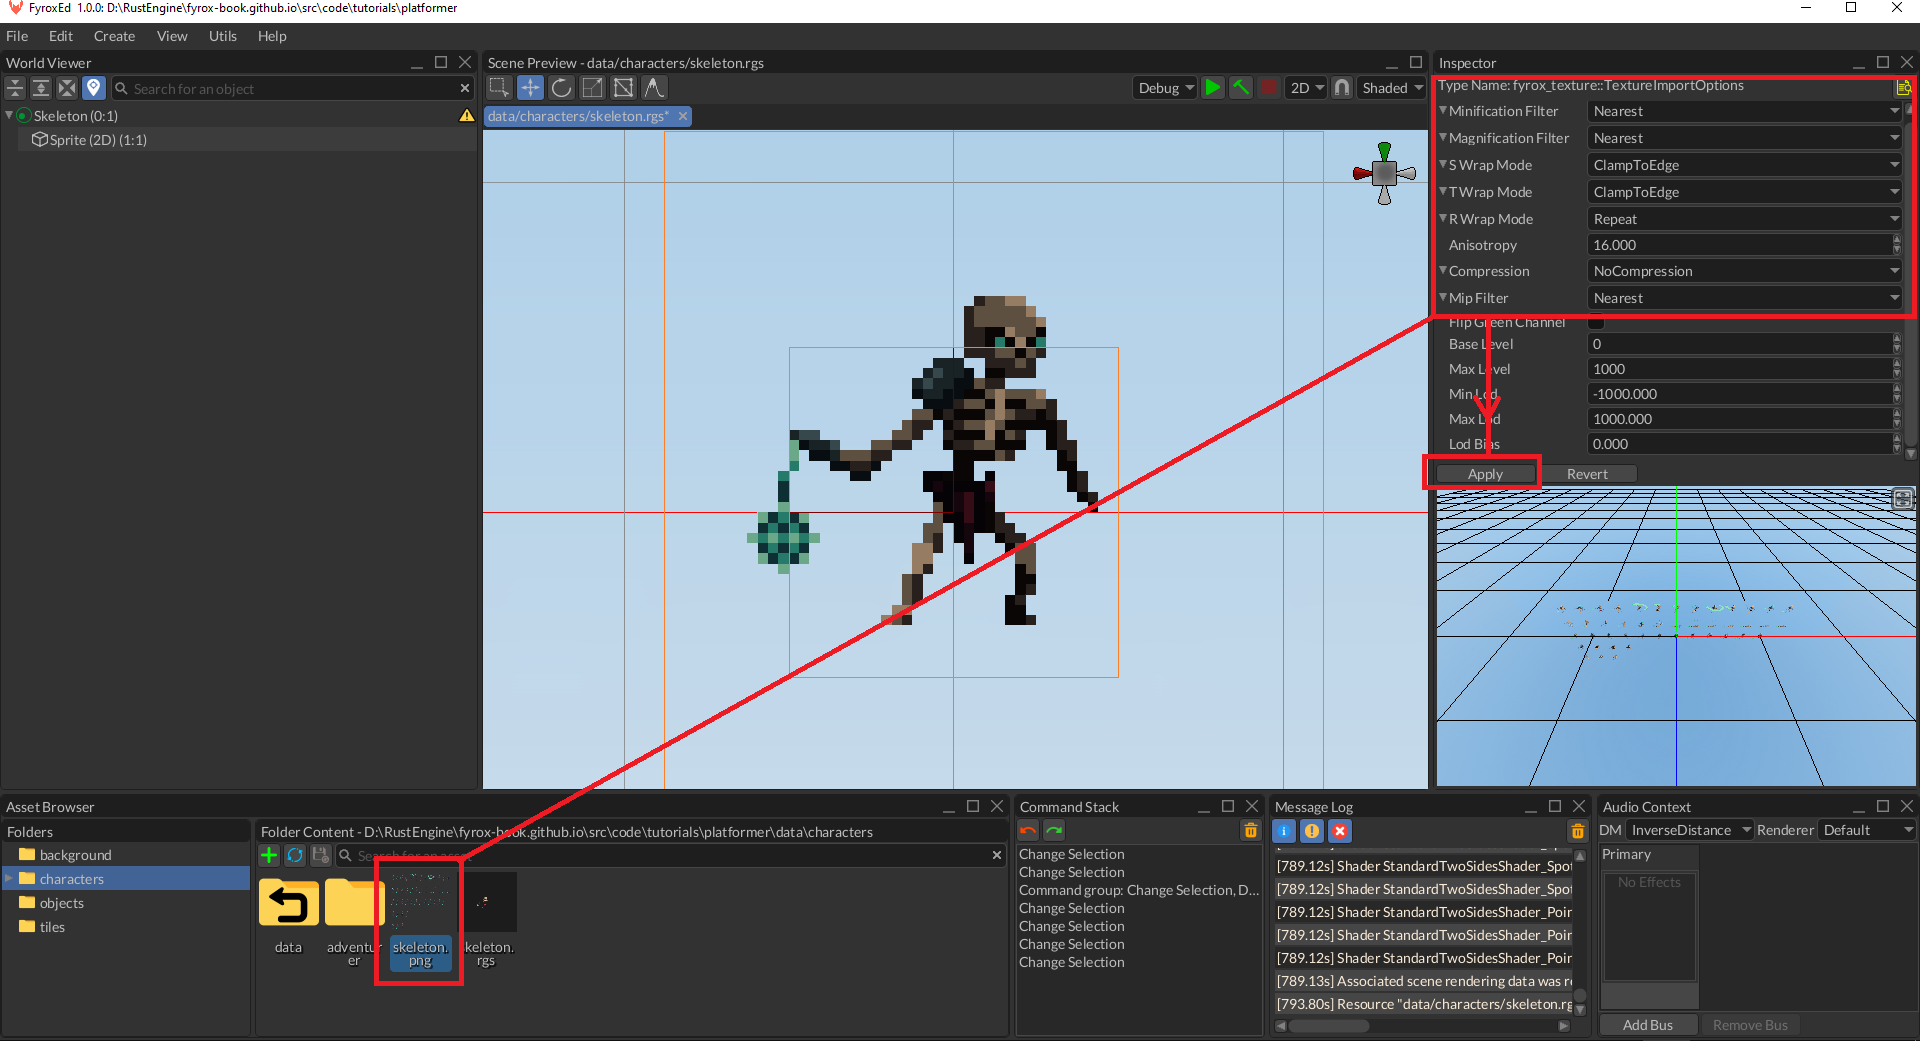
Properties of the skeleton.png should be something like this. Do not forget to click Apply after changing settings.
If you look closely at the world viewer, you should notice a small warning sign near the rigid body - the editor tells
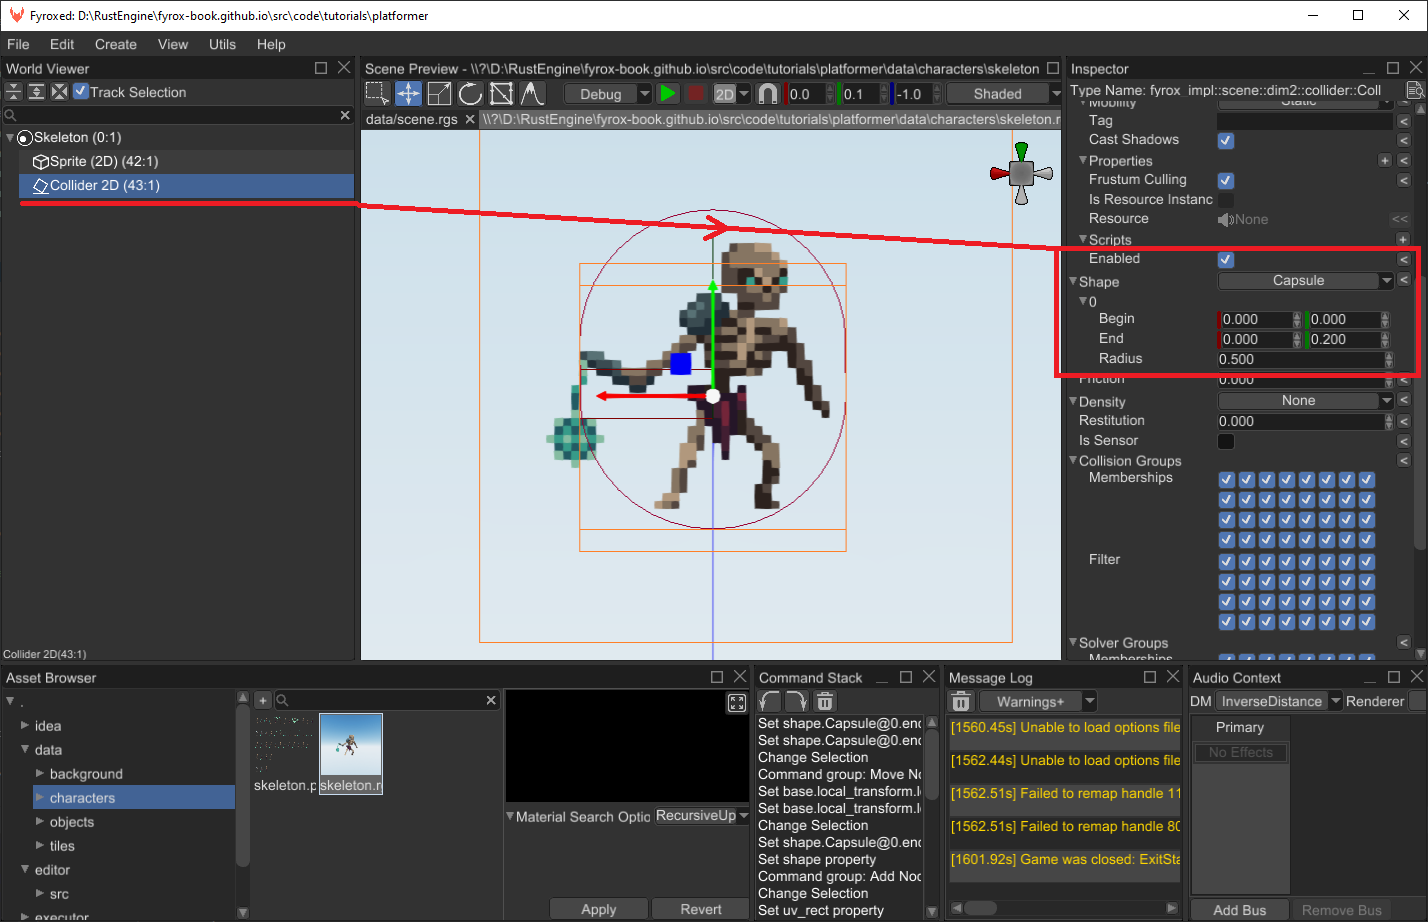
us that we’ve forgotten to add a collider to the rigid body. Let’s fix this by right-clicking on the rigid body, then
select Create Child -> Physics 2D -> Collider. Select the collider and set its shape to Capsule in the properties
like so:
We’re almost finished with our prefab, the last step is to configure properties of the rigid body. Currently, we have a simple rigid body, that will rotate freely during collisions and will also “sleep” on inactivity, which will prevent the body from moving. Let’s fix this by selecting the rigid body in the inspector and disable rotational movement and prevent it from sleeping:
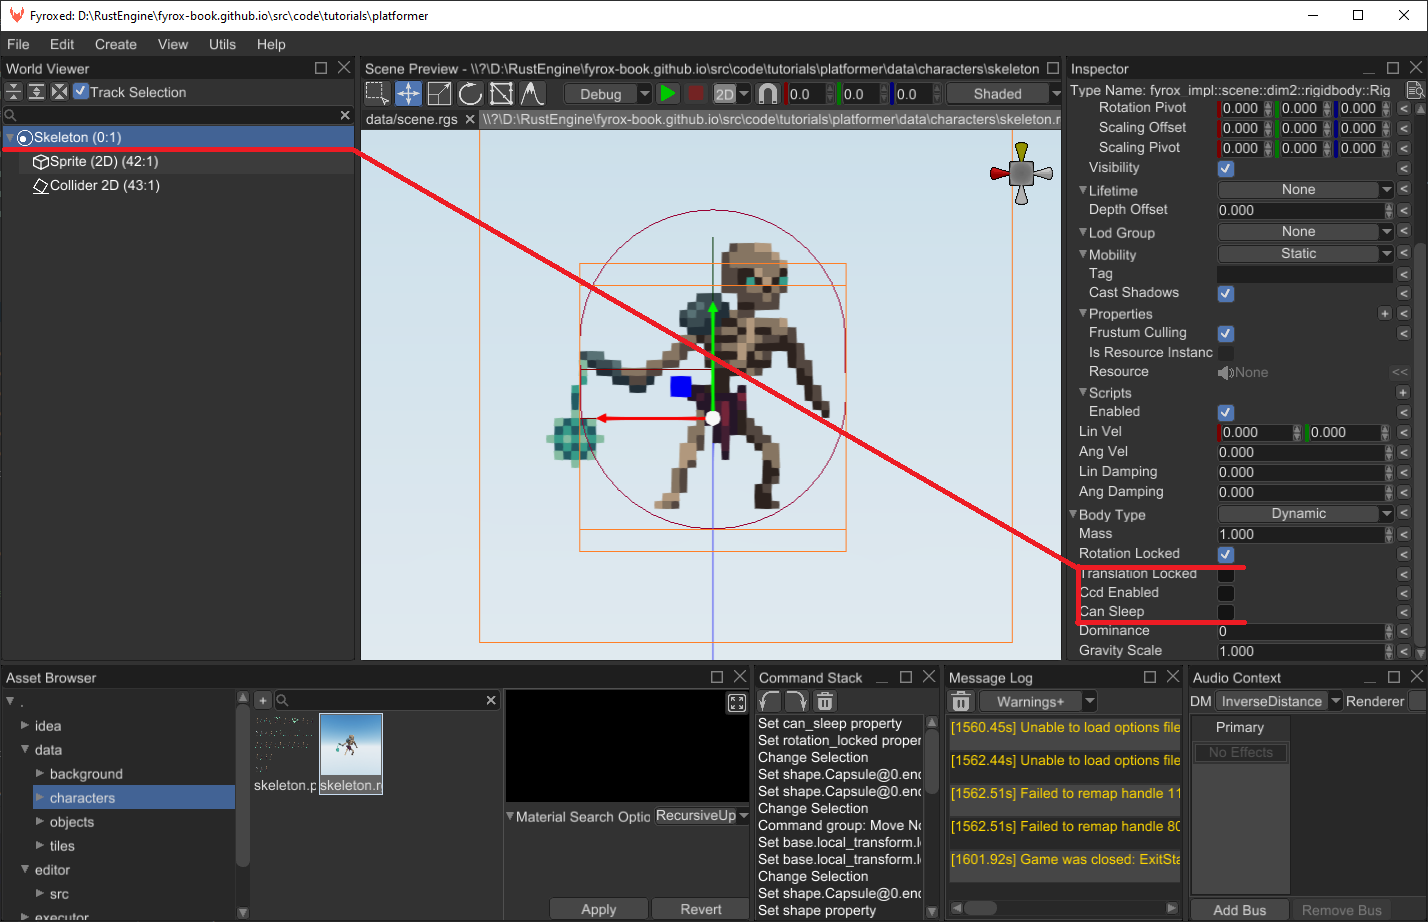
The “skeleton” of our skeleton (pun intended) prefab is finished, and now we can start writing some code.
Script
Now on to the code part, run the following command in the root folder of your game: fyrox-template script --name=bot and add
the mod bot; line at the beginning of lib.rs of the game package. The code for the script will look something like
this:
#![allow(unused)]
fn main() {
#[derive(Visit, Reflect, Default, Debug, Clone, TypeUuidProvider, ComponentProvider)]
#[type_uuid(id = "d2786d36-a0af-4e67-916a-438af62f818b")]
#[visit(optional)]
pub struct Bot {
    // Add fields here.
}

impl ScriptTrait for Bot {
    fn on_init(&mut self, context: &mut ScriptContext) -> GameResult {
        // Put initialization logic here.
        Ok(())
    }

    fn on_start(&mut self, context: &mut ScriptContext) -> GameResult {
        // There should be a logic that depends on other scripts in scene.
        // It is called right after **all** scripts were initialized.
        Ok(())
    }

    fn on_deinit(&mut self, context: &mut ScriptDeinitContext) -> GameResult {
        // Put de-initialization logic here.
        Ok(())
    }

    fn on_os_event(&mut self, event: &Event<()>, context: &mut ScriptContext) -> GameResult {
        // Respond to OS events here.
        Ok(())
    }

    fn on_update(&mut self, context: &mut ScriptContext) -> GameResult {
        // Put object logic here.
        Ok(())
    }
}
}
We need only on_update method, and the rest methods can be removed. Register the script by adding
script_constructors.add::<Bot>("Bot"); line near the script_constructors.add::<Player>("Player");
line in lib.rs (as we did in the previous part of the tutorial). We also need to import all required types for the bot,
replace all the imports at the beginning of the bot.rs with the following:
#![allow(unused)]
fn main() {
use crate::Game;
use fyrox::plugin::error::{GameError, GameResult};
use fyrox::{
    core::{
        algebra::Vector2, pool::Handle, reflect::prelude::*, type_traits::prelude::*,
        variable::InheritableVariable, visitor::prelude::*,
    },
    graph::SceneGraph,
    scene::{
        animation::spritesheet::SpriteSheetAnimation,
        dim2::{
            collider::Collider, physics::RayCastOptions, rectangle::Rectangle, rigidbody::RigidBody,
        },
        node::Node,
        rigidbody::RigidBodyType,
    },
    script::{ScriptContext, ScriptTrait},
};
}
We need to store a handle to the sprite in our script, add the following field in the Bot struct:
#![allow(unused)]
fn main() {
    rectangle: InheritableVariable<Handle<Rectangle>>,
}
Open the skeleton prefab and assign the script to the root rigid body. Set the rectangle field to Sprite (2D) and
save the prefab. Great, now let’s begin writing the actual AI code of the bot.
Patrol
By default, when there’s no target nearby the bot will patrol in available bounds. Basically, it will walk from one “wall”
to another. Add the following fields to the Bot script:
#![allow(unused)]
fn main() {
    speed: InheritableVariable<f32>,
    direction: f32,
    front_obstacle_sensor: InheritableVariable<Handle<Collider>>,
    back_obstacle_sensor: InheritableVariable<Handle<Collider>>,
}
speed field will define overall movement speed of the bot and direction will be used to alternate movement direction
along X axis. Open the skeleton prefab and set the speed to 1.2 and the direction to -1.0. Add the movement handling
code somewhere in the impl Bot:
#![allow(unused)]
fn main() {
    fn do_move(&mut self, ctx: &mut ScriptContext) -> GameResult {
        let graph = &mut ctx.scene.graph;

        graph
            .try_get_mut_of_type::<RigidBody>(ctx.handle)?
            .set_lin_vel_x(-*self.speed * self.direction);

        graph
            .try_get_mut(*self.rectangle)?
            .set_scale_xyz(2.0 * self.direction.signum(), 2.0, 1.0);

        Ok(())
    }
}
This code is quite straightforward - at first, we’re doing a checked borrow of the node that contains the script. It must
be of dim2::RigidBody type. Then we’re setting horizontal speed of body using speed and direction variables we’ve
added earlier. As the last step we’re changing horizontal scale of the sprite using sign of the current direction. This
way we’re flipping the sprite in the current direction. Now we need to call do_move method in on_update like so:
#![allow(unused)]
fn main() {
        self.do_move(ctx)?;
}
Open the main scene (scene.rgs by default) and find the skeleton prefab in the asset browser, drag’n’drop it in the
scene and adjust its position to get something like this:
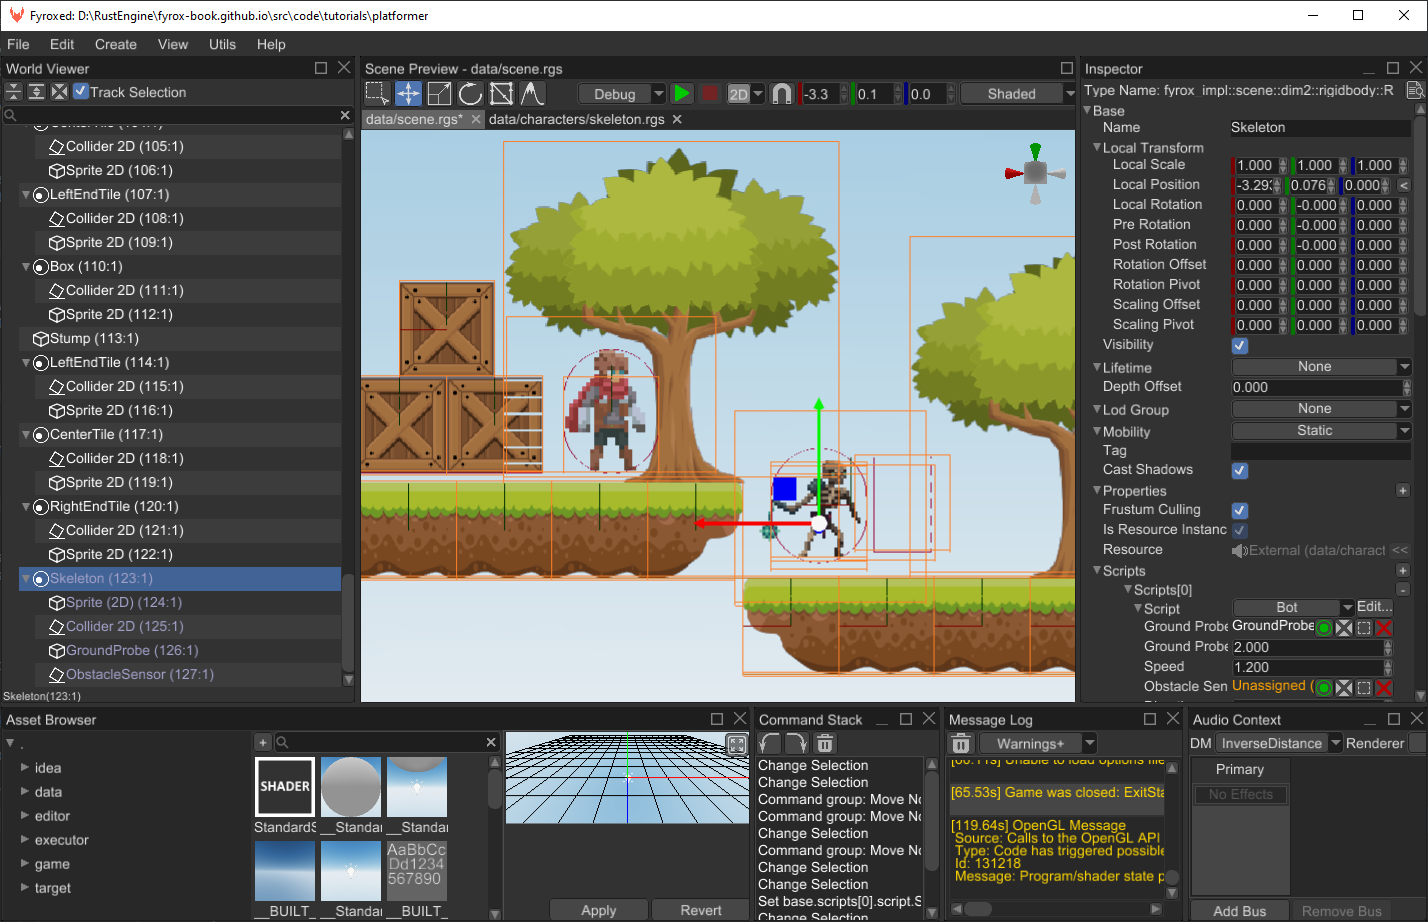
Run the game, and you should see the skeleton moving away from the player to the right. Cool, but the bot will be stuck
immediately when it hits a wall, so we also need a way of detecting obstacles along the way, so the bot could “understand”
when it should change movement direction. We’ll use sensor collider for this purpose. Open the skeleton prefab and create
two new 2D colliders under the root Skeleton node, adjust their sizes to be something similar to the following screenshot:

It is very important to have Is Sensor property checked on both colliders, we don’t need the collider to participate
in actual collision detection - it will be used only in intersection checks with the environment. Do not forget to assign
handles of both FrontObstacleSensor and BackObstacleSensor to the respective fields in the Bot script instance on
the root rigid body.
Now onto the movement algorithm, it is quite simple: move the bot horizontally in the current direction until one of the obstacle sensors intersects with an obstacle. In this case all we need to do is to switch the current direction to opposite (from 1.0 to -1.0 and vice versa). This way the bot will patrol arbitrary level parts quite easily and reliably and there’s no need to manually place any way points.
Obstacles checking algorithms is quite simple, add the following code in the impl Bot:
#![allow(unused)]
fn main() {
    fn has_obstacles(&mut self, ctx: &mut ScriptContext) -> Result<bool, GameError> {
        let graph = &ctx.scene.graph;

        // Select the sensor using current walking direction.
        let sensor_handle = if self.direction < 0.0 {
            *self.back_obstacle_sensor
        } else {
            *self.front_obstacle_sensor
        };

        // Check if it intersects something.
        let obstacle_sensor = graph.try_get(sensor_handle)?;

        for intersection in obstacle_sensor
            .intersects(&ctx.scene.graph.physics2d)
            .filter(|i| i.has_any_active_contact)
        {
            for collider_handle in [intersection.collider1, intersection.collider2] {
                let other_collider = graph.try_get(collider_handle)?;
                let rigid_body = graph.try_get_of_type::<RigidBody>(other_collider.parent())?;

                if rigid_body.body_type() == RigidBodyType::Static {
                    return Ok(true);
                }
            }
        }

        Ok(false)
    }
}
At first, it selects the sensor using the current movement direction, then it fetches all intersection events from it
and checks if there’s at least one static rigid body intersected. Remember, that we’ve set static rigid bodies for our
level tiles. As the final step, add the following code to the on_update:
#![allow(unused)]
fn main() {
        if self.has_obstacles(ctx)? {
            self.direction = -self.direction;
        }
}
This code is very simple - if there’s an obstacle, then change movement direction to opposite. Now run the game and the bot should change its direction when it detects an obstacle before it. It should look like this:
There’s no animations yet, but the basic movement works ok. We’ll add animations later in this tutorial.
Ground Checks
At this moment, our bot can move, but it can easily fall off the ledge into “abyss” and die. Let’s prevent that by adding ground check, that will be used to switch movement direction also. How will we check for ground presence anyway? We’ll do this using simple ray casting. At first, add the following fields to the bot script:
#![allow(unused)]
fn main() {
    ground_probe: InheritableVariable<Handle<Node>>,
    ground_probe_distance: InheritableVariable<f32>,
    ground_probe_timeout: f32,
}
ground_probe field will be used to store a handle of a point scene node, that will be used as a starting point for ray
casting. ground_probe_distance field is used to define maximum distance, after which ray casting considered failed.
Now add the following code in the impl Bot:
#![allow(unused)]
fn main() {
impl Bot {
    fn has_ground_in_front(&self, ctx: &ScriptContext) -> Result<bool, GameError> {
        let graph = &ctx.scene.graph;

        // Do ground check using ray casting from the ground probe position down at some distance.
        let ground_probe = graph.try_get(*self.ground_probe)?;

        let ground_probe_position = ground_probe.global_position().xy();

        let mut intersections = Vec::new();
        graph.physics2d.cast_ray(
            RayCastOptions {
                ray_origin: ground_probe_position.into(),
                // Cast the ray
                ray_direction: Vector2::new(0.0, -*self.ground_probe_distance),
                max_len: *self.ground_probe_distance,
                groups: Default::default(),
                // Make sure the closest intersection will be first in the list of intersections.
                sort_results: true,
            },
            &mut intersections,
        );

        for intersection in intersections {
            let collider = graph.try_get(intersection.collider)?;
            let rigid_body = graph.try_get_of_type::<RigidBody>(collider.parent())?;
            let distance = intersection
                .position
                .coords
                .metric_distance(&ground_probe_position);
            if rigid_body.body_type() == RigidBodyType::Static
                && distance <= *self.ground_probe_distance
            {
                return Ok(true);
            }
        }

        Ok(false)
    }
}
Open the skeleton prefab and create the ground probe like so:
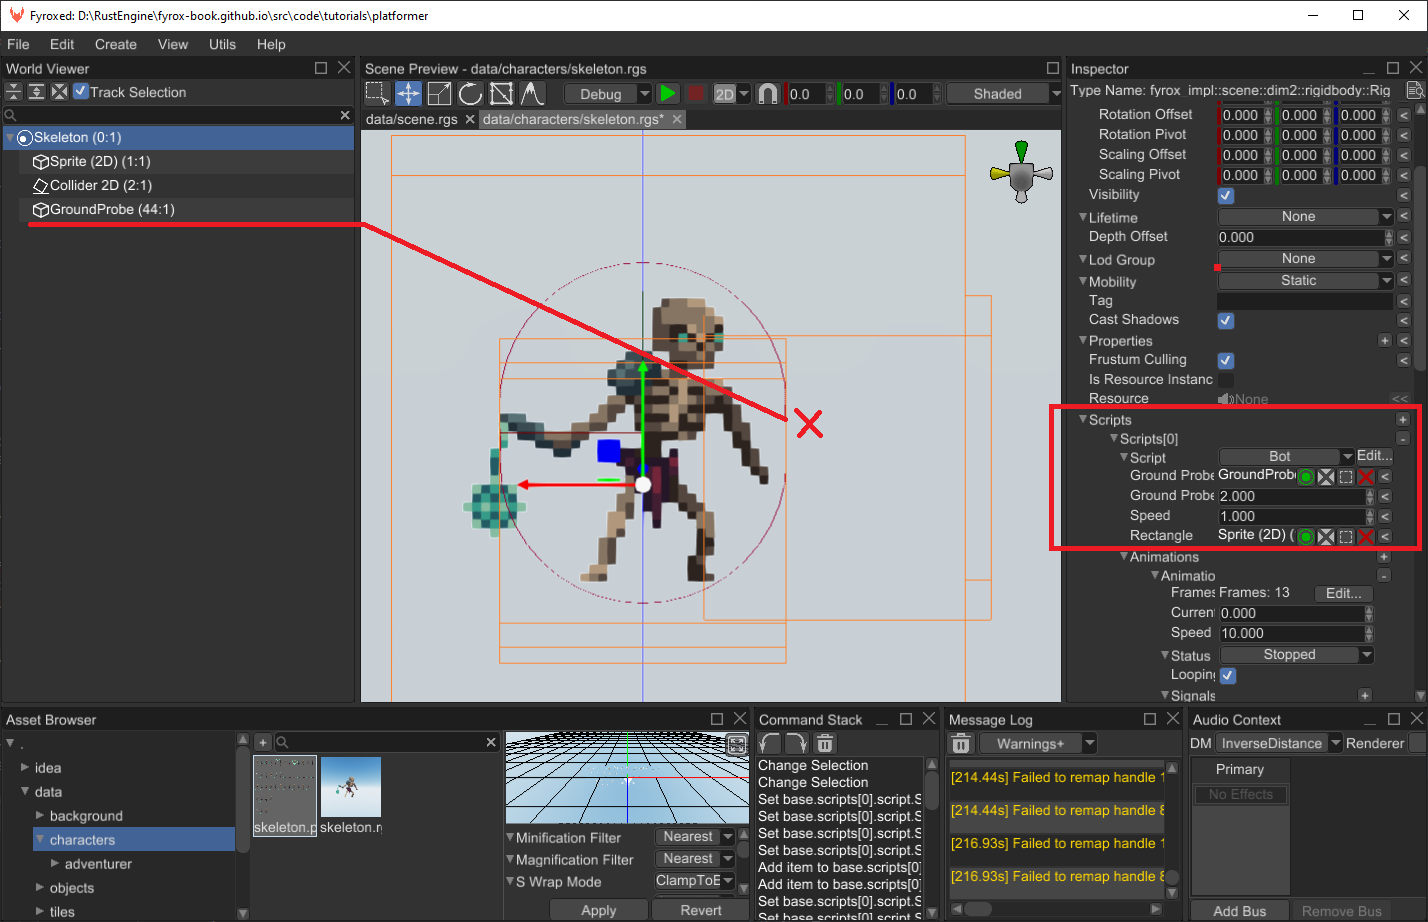
Do not forget to assign its handle to the bot script as well. Add the final piece of code to on_update:
#![allow(unused)]
fn main() {
        self.ground_probe_timeout -= ctx.dt;
        if self.ground_probe_timeout <= 0.0 {
            if !self.has_ground_in_front(ctx)? {
                self.direction = -self.direction;
            }
            self.ground_probe_timeout = 0.3;
        }
}
Open the editor and add another skeleton somewhere, where it can easily fall off the ledge. Run the game and the skeleton should avoid such place and walk back and forth on a platform.
Targets
When the bot is patrolling, it will search for a target to attack. Bots will be able to attack only the player, so we just need to check if the player is in front of a bot and close enough to it. We need a way to get player’s handle, we could just iterate over the scene and search for it at every frame, but that’s inefficient and there’s a better way. All we need to do is to slightly modify the plugin and the player script. Add the following field to the plugin:
#![allow(unused)]
fn main() {
    player: Handle<Node>,
}
Now we need to set this handle somehow, the ideal place for it is on_start method of the Player script:
#![allow(unused)]
fn main() {
    fn on_start(&mut self, ctx: &mut ScriptContext) -> GameResult {
        ctx.plugins.get_mut::<Game>().player = ctx.handle;
        Ok(())
    }
}
Great, now when the player script is created and initialized, it will register itself in the plugin. Now we can use this handle
in the bot’s target searching routine. Add the following code to the impl Bot:
#![allow(unused)]
fn main() {
    fn search_target(&mut self, ctx: &mut ScriptContext) -> GameResult {
        let game = ctx.plugins.get::<Game>();

        let self_position = ctx.scene.graph[ctx.handle].global_position();

        let player = ctx.scene.graph.try_get(game.player)?;

        let player_position = player.global_position();

        let signed_distance = player_position.x - self_position.x;
        if signed_distance.abs() < 3.0 && signed_distance.signum() != self.direction.signum() {
            self.target = game.player;
        }
        Ok(())
    }
}
This code is very straightforward - at first, we’re fetching a reference to the plugin (in which we’ve just stored player’s
handle). Then we’re getting self position of the bot and player’s position. Finally, to check if the bot can “see” the
player we’re calculating horizontal distance between the player and the bot, checking its absolute value to be less than
some sensible threshold and also checking the sign of the distance. If the sign of the distance is opposite to the sign of
the direction, then the bot can see the player. As the last step, call this method in the on_update method:
#![allow(unused)]
fn main() {
    fn on_update(&mut self, ctx: &mut ScriptContext) -> GameResult {
        self.search_target(ctx)?;
}
If there’s a target, then the bot will follow it and try to attack when it is close enough. To implement this, all we need
to do is to alternate movement direction according to a target position. Add the following code in on_update, but after
any other direction modifications - target following will have priority over any other actions.
#![allow(unused)]
fn main() {
        if self.target.is_some() {
            let target_position = ctx.scene.graph[self.target].global_position();
            let self_position = ctx.scene.graph[ctx.handle].global_position();
            self.direction = (self_position.x - target_position.x).signum();

            // Stand still while attacking.
            if target_position.metric_distance(&self_position) > 1.1 {
                self.speed.set_value_and_mark_modified(1.2);
            } else {
                self.speed.set_value_and_mark_modified(0.0);
            }
        }
}
Animations
Our bot can patrol, search and follow targets, but all of this is not properly visualized since we’re not using any animations
for such actions. Let’s fix this, add the following fields to the Bot structure:
#![allow(unused)]
fn main() {
animations: Vec<SpriteSheetAnimation>,
current_animation: InheritableVariable<u32>,
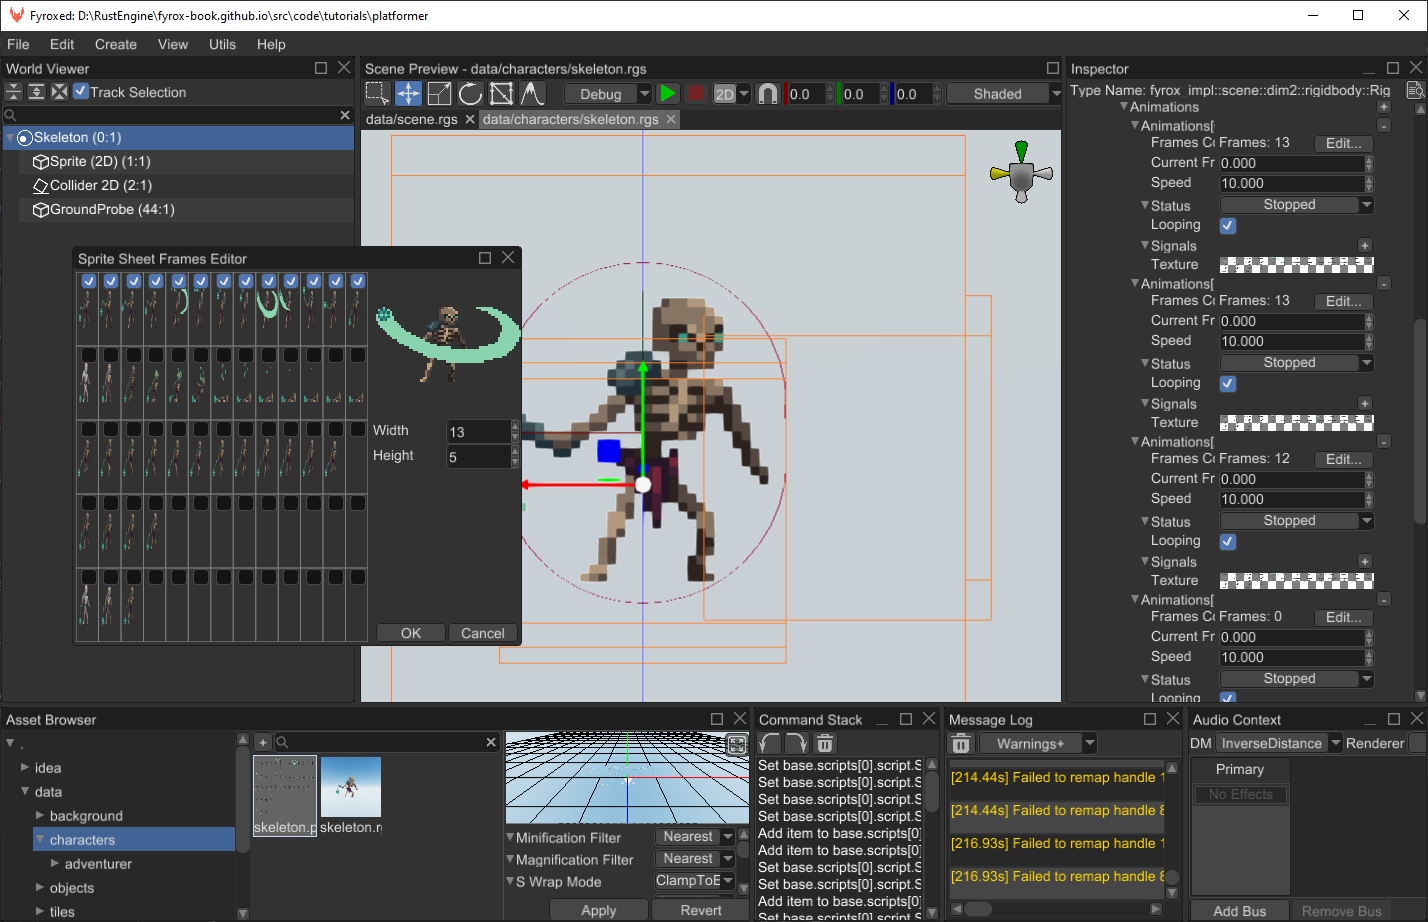
}As with the player from the previous tutorial, we’ll use sprite sheet animations. Open the bot prefab and select the rigid body, add five animations and fill every slot. For example, attack animation will look like this:
If you have any issues with this, see previous part of the tutorial to learn how to use sprite sheet animations editor.
Remember, that we have 5 animations and their indices are the following: 0 - attack, 1 - death, 2 - walk, 3 - idle, 4 - hit
reaction. Now on to the animation switching. We need to handle just two animations for now - walking and attacking. Add
the following code somewhere in the on_update:
#![allow(unused)]
fn main() {
        if self.direction != 0.0 {
            self.current_animation.set_value_and_mark_modified(2);
        }
        if self.target.is_some() {
            let target_position = ctx.scene.graph[self.target].global_position();
            let self_position = ctx.scene.graph[ctx.handle].global_position();
            if target_position.metric_distance(&self_position) < 1.1 {
                self.current_animation.set_value_and_mark_modified(0);
            }
        }
}
Here we just switch current animation index. If the bot is moving, then movement animation is selected (with index 2) and
if there’s a target (and it is close enough), then the attack animation is selected (with index 0). The last step is to
apply the animation to the bot’s sprite. Add the following code at the end of on_update:
#![allow(unused)]
fn main() {
        if let Some(current_animation) = self.animations.get_mut(*self.current_animation as usize) {
            current_animation.update(ctx.dt);

            ctx.scene
                .graph
                .try_get_mut(*self.rectangle)?
                .apply_animation(current_animation);
        }
}
Run the game and you should see something like this:
You can create multiple instances of the skeleton and place them in different places on your level, to make the game more interesting. This tutorial teaches about technical details, not game design, so use your imagination and experiment with different approaches.
Conclusion
In this tutorial we’ve learned how to create basic AI, that can patrol an area, search for a target, follow and attack it. In the next tutorial we’ll add damage system, ability to attack for the player and the bot and various items, such as healing potions.