Asset Management
This chapter covers asset management in the engine. Asset management is performed by Asset Browser in the editor
and by ResourceManager from API.
General Info
Assets loading is asynchronous, it is possible to load multiple assets in parallel or load until a specific asset is loaded.
Best Practices
It is strongly advised to specify all resources used by your game entities inside your scripts, instead of requesting resources directly from the resource manager on demand. This approach solves two common issues:
- It allows you to set resources directly from the editor by a simple drag’n’drop from the Asset Browser.
- The engine will be able to wait until all resources used by a scene are fully loaded. This is especially important, because this way can guarantee, that scene loading will be “seamless” and if the scene was loaded, it means that all resources used by it are loaded too.
This can be achieved by adding a respective field in your script. For example, you may a have a weapon script that
shoots some projectiles. In this case all you need to add a projectile: Option<ModelResource> field in your script,
assign it to some prefab in the editor and then instantiate it from code when shooting.
Storing
resource handle directly in your script helps the engine to gather all resources used by parent scene and preload them
too while loading the scene itself. Such approach prevent lags when doing actual shooting, which is especially important
if you’re targeting a WebAssembly platform. On WebAssembly all the files accessed over network API which could work with
unstable connection. In any case, even on PC it helps a lot.
Requesting resources on demand could be useful in limited situations:
- You’re loading a new game level - in this case it is perfectly fine to request the resource manually.
- You’re doing some background work (level streaming for instance).
Asset Browser
Asset browser allows you to preview your assets and edit their import properties. It looks something like this (keep in mind that the screenshot could be outdated).
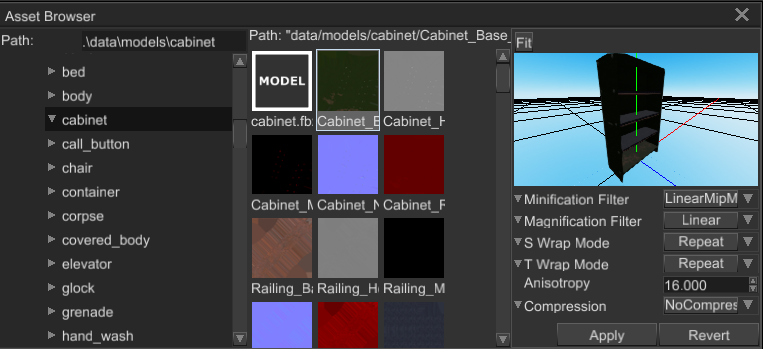
There are three main areas in it:
- Left directory tree - shows all directories starting from project root. It does not show any files, this is for what the center section is.
- Center asset previewer - shows all assets from selected directory. The path at the top of the section shows asset path.
- Right asset import options inspector - it shows import properties of selected asset.
Typical workflow could look like this:
- Select desired directory from the left tree
- Select desired asset in the center previewer
- Edit import properties of selected asset and click “Apply” button to save import options and re-load the asset with new options.
Alternatively, you can just type in the name of some resource you’re looking for in the search bar at the top of the Asset Browser.
Check next chapters to learn how to manage specific asset types and what their import does what.
API Docs
Please read API docs here
Internal State and Access to Data
Resource itself is a small state machine that is used in asynchronous loading. When you’ve requested a resource from
a resource manager, at first it looks for loaded instance and if it is found - shares a handle to the resource with you.
If there’s no such resource, it creates a new instance with Pending state and immediately returns it to you.
All pending resources are placed in some sort of queue which is then processed by a set of worker threads that does
the loading. When a worker thread finished loading of a resource, it marks the resource either as Ok or LoadError,
depending on whether the loading was successful or not respectively. This process makes access to the data more
convoluted.
In simple cases when you don’t need the data immediately after request, you can use checked access to resource data:
#![allow(unused)]
fn main() {
fn checked_access(texture_resource: &Resource<Texture>) {
    let mut state = texture_resource.state();
    if let Some(texture) = state.data() {
        println!("Kind: {:?}", texture.kind());
    }
}
}
This is relatively cheap, it tries to block a mutex and checks the actual state of the resource. If it is loaded, the reference is returned to you. In some cases you know for sure that a resource is loaded and its data can be obtained like so:
#![allow(unused)]
fn main() {
fn unchecked_access(texture_resource: &Resource<Texture>) {
    let texture = texture_resource.data_ref();
    println!("Kind: {:?}", texture.kind());
}
}
Keep in mind that data_ref call will panic if the resource isn’t loaded. Try to avoid using this method everywhere,
especially if you aren’t sure about the state of the resource. Never use it in combination with request method of
resource manager, because it most likely will panic randomly, because of async loading.
Every resource implements Future trait and can be awaited in async functions and multiple resources could be
awaited simultaneously:
#![allow(unused)]
fn main() {
async fn await_resource(texture_resource: Resource<Texture>) {
    if let Ok(result) = texture_resource.await {
        // `data_ref` will never panic after the above check.
        let texture = result.data_ref();
        println!("Kind: {:?}", texture.kind());
    };
}
}
When the data is needed right after the request call, you need to block current thread until the resources is fully
loaded. Depending on the platform, you can use futures::block_on to block current thread in-place and get the resource
data:
#![allow(unused)]
fn main() {
fn block_and_wait(texture_resource: Resource<Texture>) {
    // Block the current thread and wait until the resource is loaded.
    if let Ok(result) = futures::executor::block_on(texture_resource) {
        // `data_ref` will never panic after the above check.
        let texture = result.data_ref();
        println!("Kind: {:?}", texture.kind());
    };
}
}
This approach has its disadvantages, the most notable one is lack of proper support on WebAssembly. In short:
main thread cannot be blocked in JS to let any background tasks to finish because of micro-task system which
works in the same thread. All of this complicates even more because of async nature of resource loading in JS.
Internally Fyrox relies on fetch API, which is async by design and non-blocking. All these problems could be
avoided by embedding resources directly in the binary of your game using include_bytes! macro:
#![allow(unused)]
fn main() {
fn embedded_resource() -> Option<Resource<Texture>> {
    let data = include_bytes!("texture.png");
    TextureResource::load_from_memory(
        uuid!("cb05986b-5483-4509-826c-8d90280b2eb8"),
        Default::default(),
        data,
        TextureImportOptions::default()
            .with_compression(CompressionOptions::NoCompression)
            .with_minification_filter(TextureMinificationFilter::Linear),
    )
    .ok()
}
}