Weapons
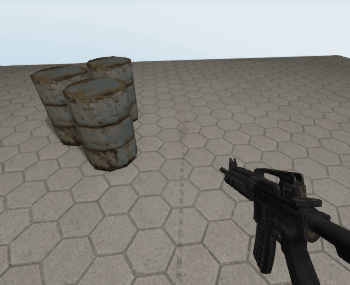
In the previous tutorial we’ve added basic character controller, but what is a first-person shooter without weapons? Let’s add them. In the end of the tutorial you should get something like this:
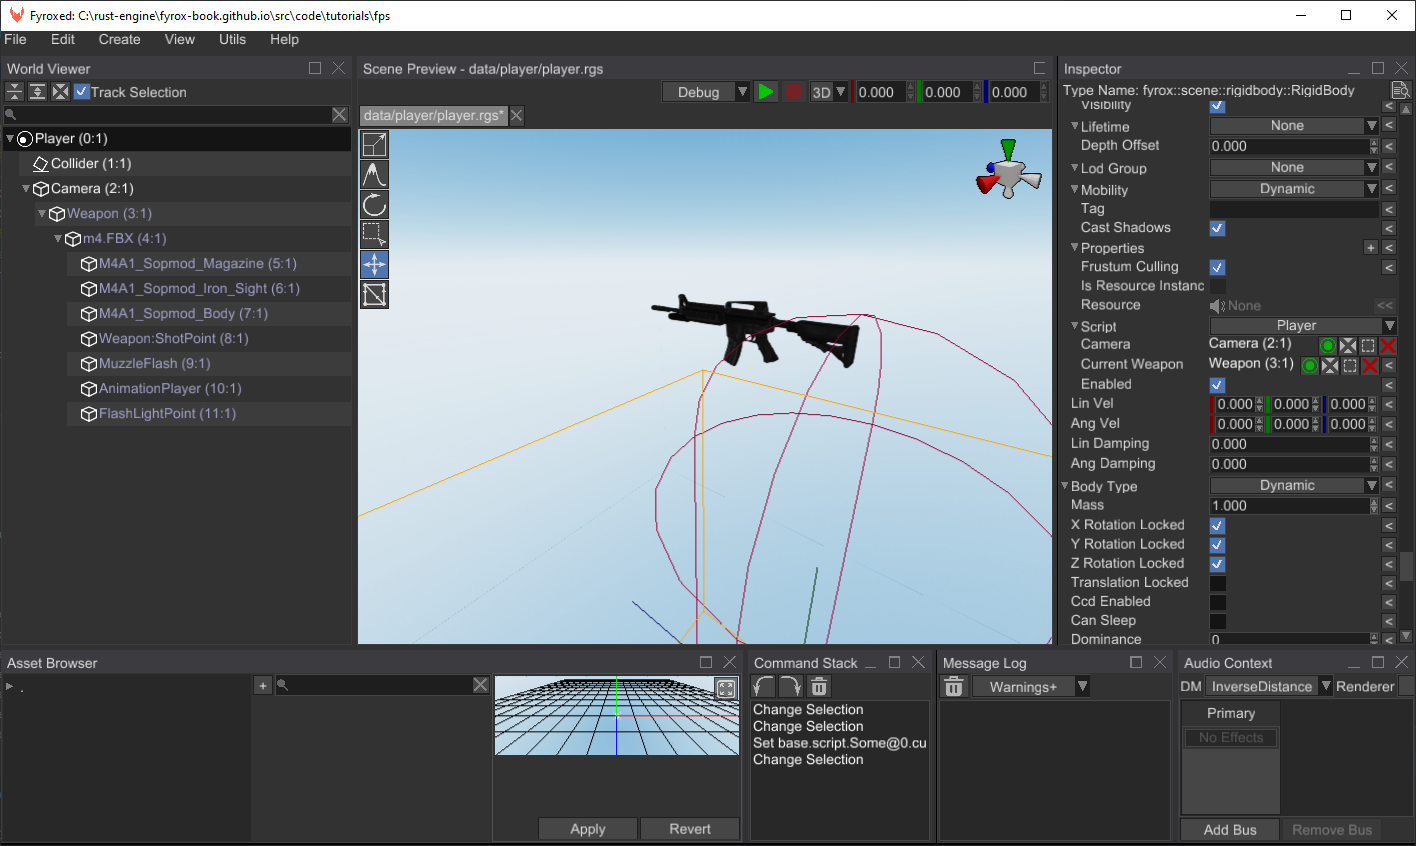
Weapon Prefab
At first, we need a 3D model for our weapon - use this ZIP-archive - it contains an M4 rifle 3D model that is
prepared for direct usage in the engine. Unzip this archive in data/models folder. Now we can start by making a prefab
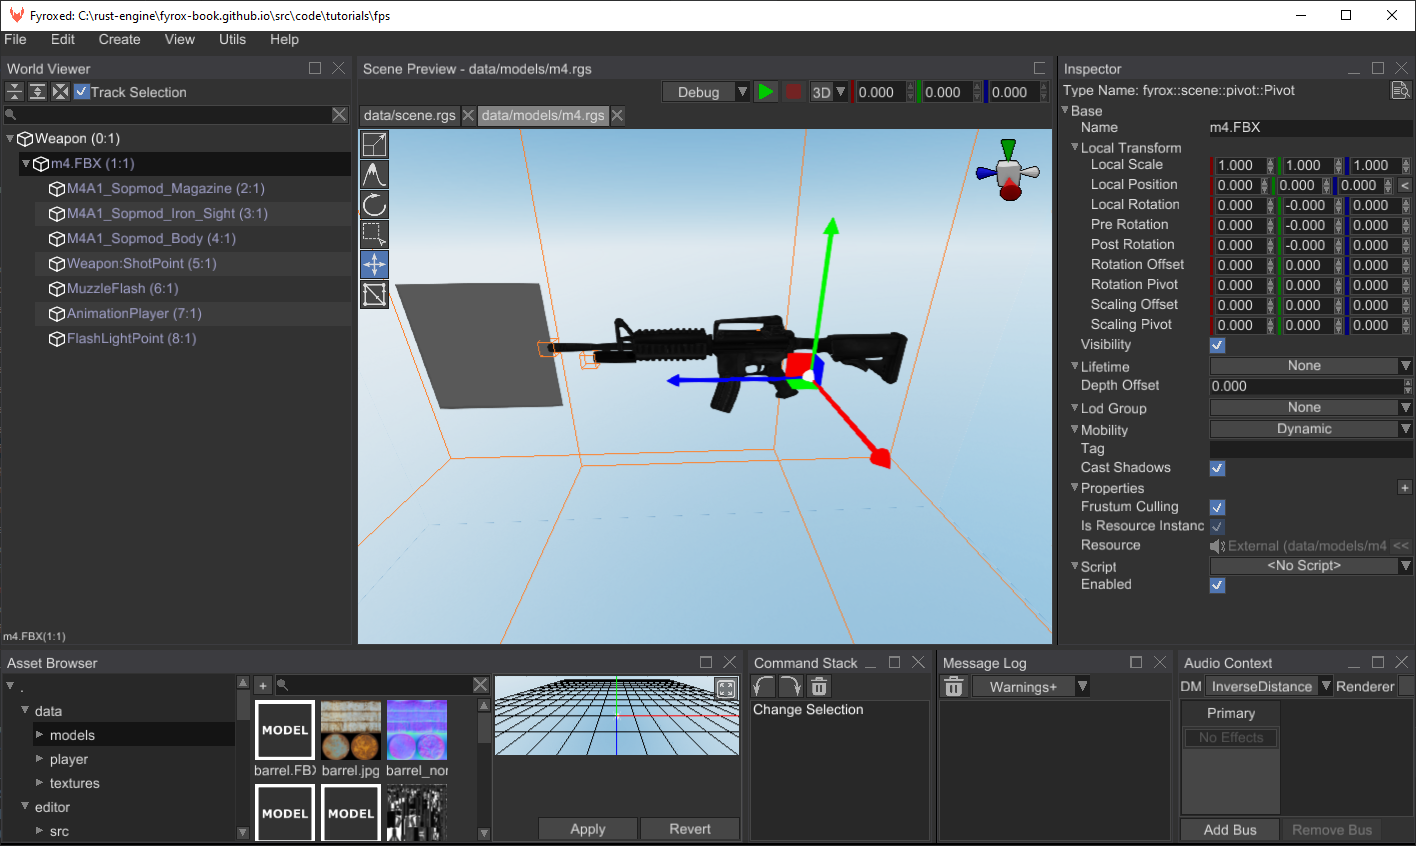
for our weapon. Create a new scene (File -> NewScene) and find the m4.FBX 3D model in the Asset Browser and instantiate
it in the scene by dragging it using mouse. Make sure to set location position of the weapon to (0, 0, 0). You
should get something like this:
This prefab is almost ready, all we need to do is to create a script for it that will contain a code for shooting.
Code
As usual, we need a script that will “drive” our weapons, run the following command at the root folder of your game:
fyrox-template script --name=weapon
Add the weapon mod to the lib.rs module using pub mod weapon;. This script will spawn projectiles and play shooting
animation when we’ll shoot the weapon. Let’s add a “reference” to our projectile prefab that will be used for shooing:
#![allow(unused)]
fn main() {
    projectile: InheritableVariable<Option<ModelResource>>,
}
This field has quite complex type: InheritableVariable is used for property inheritance,
Option is used to allow the field to be unassigned, and finally ModelResource is a reference to some projectile prefab.
We’ll assign this field later in the tutorial.
Next thing we need to define is a point from which the weapon will shoot. We can’t just use the position of the weapon,
because it will look unnatural if a projectile appear at a handle of the weapon or at some other place other than the
barrel of the weapon. We’ll use a child scene node of the weapon to define such point. Let’s add the following field
to the Weapon struct.
#![allow(unused)]
fn main() {
    shot_point: InheritableVariable<Handle<Node>>,
}
We’ll assign this field later in the tutorial as well as projectile prefab.
Now we need some mechanism to “tell” the weapon to shoot, we could directly access the weapon script and call some shoot
method, but in more or less complex game would almost certainly lead to lots of complaints from borrow checker. Instead
of this, we’ll use message passing mechanism - this will allow us to
send a request for the weapon to shoot and the weapon will shoot when it will receive the message. Let’s add a message
for shooting in weapon.rs:
#![allow(unused)]
fn main() {
#[derive(Debug)]
pub struct ShootWeaponMessage {}
impl ScriptMessagePayload for ShootWeaponMessage {}
}
To actually be able to receive this message, we need to explicitly “subscribe” out script to it. Add the following code
to the on_start method:
#![allow(unused)]
fn main() {
    fn on_start(&mut self, context: &mut ScriptContext) -> GameResult {
        context
            .message_dispatcher
            .subscribe_to::<ShootWeaponMessage>(context.handle);
        Ok(())
    }
}
Every script has on_message method that is used for a message processing, we’ll use it for shooting. Add the following
code in the impl ScriptTrait for Weapon:
#![allow(unused)]
fn main() {
    fn on_message(
        &mut self,
        message: &mut dyn ScriptMessagePayload,
        ctx: &mut ScriptMessageContext,
    ) -> GameResult {
        // Check if we've received an appropriate message. This is needed because message channel is
        // common across all scripts.
        if message.downcast_ref::<ShootWeaponMessage>().is_some() {
            if let Some(projectile_prefab) = self.projectile.as_ref() {
                // Try to get the position of the shooting point.
                let shot_point = ctx.scene.graph.try_get(*self.shot_point)?.global_position();

                // Shooting direction is just a direction of the weapon (its look vector)
                let direction = ctx.scene.graph[ctx.handle].look_vector();

                // Finally instantiate our projectile at the position and direction.
                projectile_prefab.instantiate_at(
                    ctx.scene,
                    shot_point,
                    math::vector_to_quat(direction),
                );
            }
        }
        Ok(())
    }
}
This code is pretty straightforward: at first, we’re checking the message type, then we’re checking if we have a prefab for projectiles. If so, we’re fetching a position of the shot point scene node and finally instantiating the projectile prefab.
All is left to do is to register this script and assign it in the editor. To register the script, add the following
code to the register method in lib.rs:
#![allow(unused)]
fn main() {
context
.serialization_context
.script_constructors
.add::<Weapon>("Weapon");
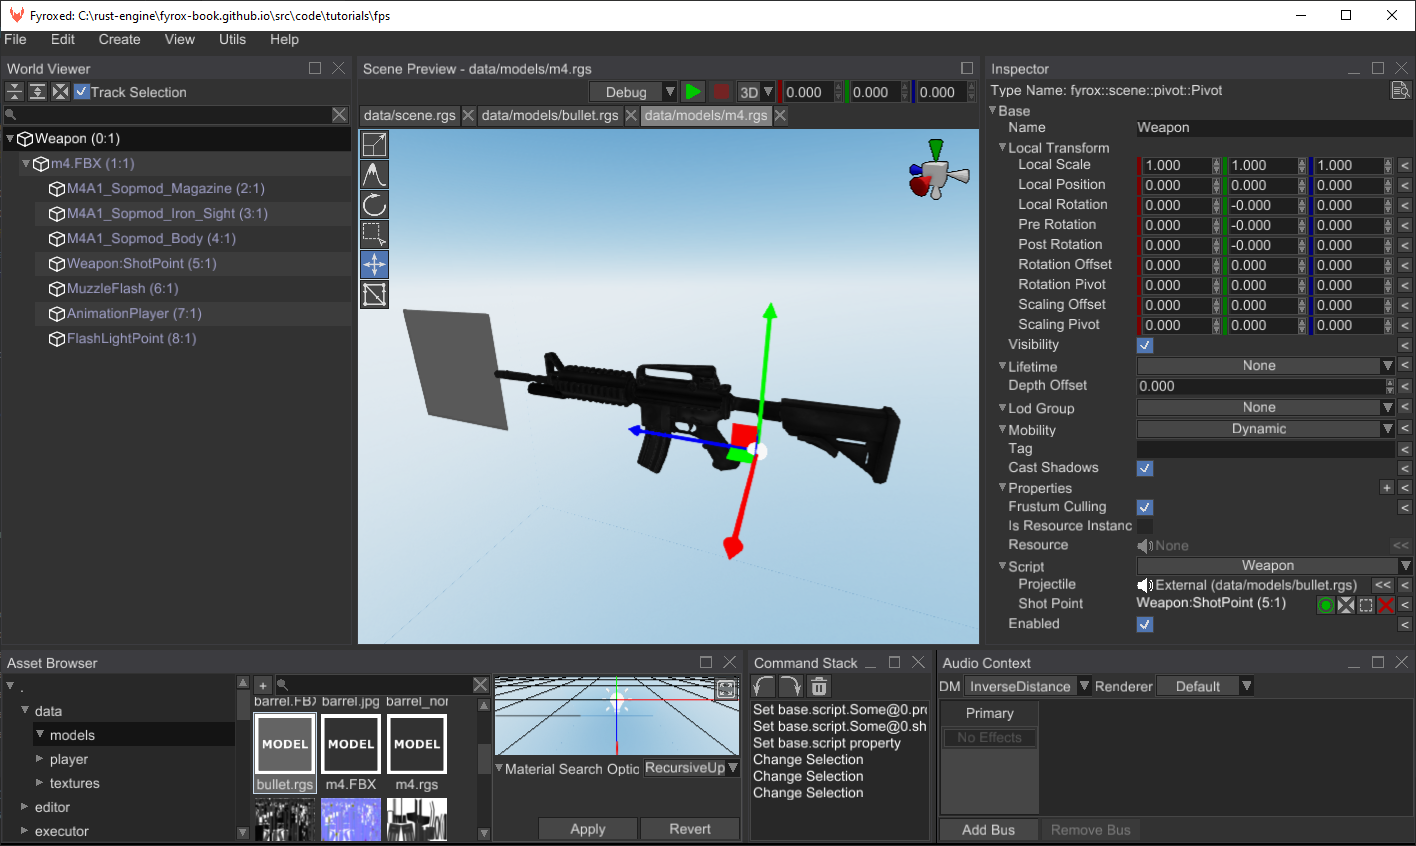
}Start the editor and open m4.rgs prefab that we made at the beginning. Select the root node of the scene add Weapon
script to it. Assign a Weapon:ShotPoint node to the Shot Point property:
The next thing we need to do is to create a prefab for projectile, that will be used for shooting.
Projectile
You may ask - why we need a prefab for projectiles, why not just make a ray-based shooting? The answer is very simple - flexibility. Once we’ll finish with this “complex” system, we’ll get very flexible weapon system that will allow you to create weapons of any kind - it could be simple bullets, grenades, rockets, plasma, etc.
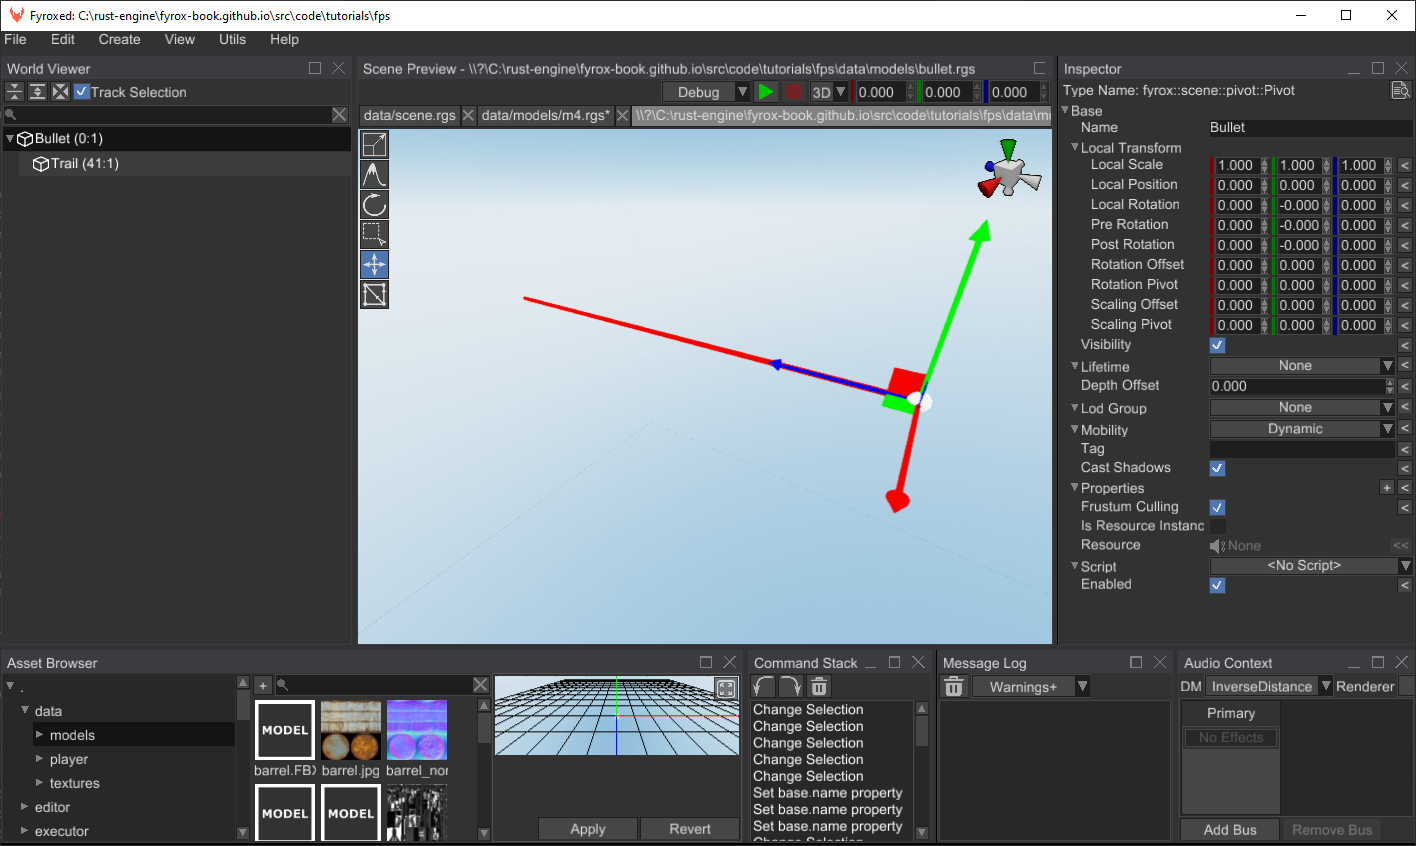
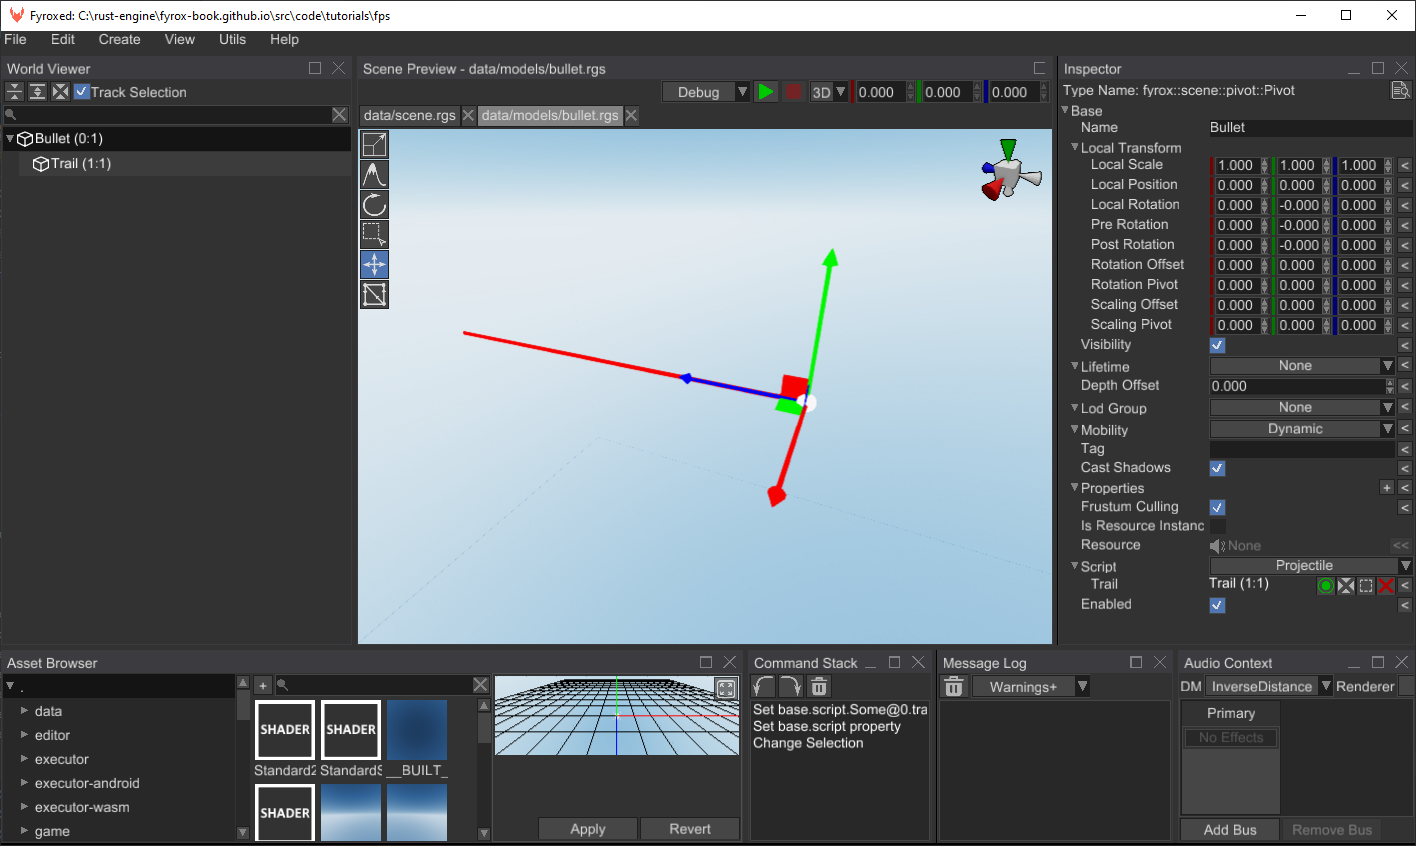
As usual, we need a prefab for our projectile. Create a new scene and add a Cylinder mesh scene node there, make sure to orient it along the Z axis (blue one) and adjust its XY scale to make it thin enough - this will be our “projectile”. It will represent a bullet trail, but in reality the “bullet” will be represented by a simple ray cast and the trail will be extended to a point of impact. Overall your prefab should look like this:
Select the root node of the prefab and set its lifetime to Some(0.1) - this will force the engine to remove the
projectile automatically after 100 ms.
The projectile also needs its own script which will do a ray casting and other actions later in the tutorial, such as hit testing with enemies, etc. Create a new script by a well known command:
fyrox-template script --name=projectile
Add the projectile mod to the lib.rs module using pub mod projectile; and register it in register method:
#![allow(unused)]
fn main() {
        context
            .serialization_context
            .script_constructors
            .add::<Projectile>("Projectile");
}
Go to projectile.rs and add the following field to the Projectile struct:
#![allow(unused)]
fn main() {
    trail: InheritableVariable<Handle<Node>>,
}
This field will hold a handle to the trail (the red cylinder on the screenshot about) and we’ll use this handle to borrow the node and modify the trail’s length after ray casting.
The ray casting itself is the core of our projectiles, add the following code to the on_start method:
#![allow(unused)]
fn main() {
    fn on_start(&mut self, ctx: &mut ScriptContext) -> GameResult {
        let this_node = &ctx.scene.graph[ctx.handle];
        let this_node_position = this_node.global_position();

        // Cast a ray in from the node in its "look" direction.
        let mut intersections = Vec::new();
        ctx.scene.graph.physics.cast_ray(
            RayCastOptions {
                ray_origin: this_node_position.into(),
                ray_direction: this_node.look_vector(),
                max_len: 1000.0,
                groups: Default::default(),
                // Sort results of the ray casting so the closest intersection will be in the
                // beginning of the list.
                sort_results: true,
            },
            &mut intersections,
        );

        let trail_length = if let Some(intersection) = intersections.first() {
            // If we got an intersection, scale the trail by the distance between the position of the node
            // with this script and the intersection position.
            this_node_position.metric_distance(&intersection.position.coords)
        } else {
            // Otherwise the trail will be as large as possible.
            1000.0
        };

        let trail_node = ctx.scene.graph.try_get_mut(*self.trail)?;
        let transform = trail_node.local_transform_mut();
        let current_trail_scale = **transform.scale();
        transform.set_scale(Vector3::new(
            // Keep x scaling.
            current_trail_scale.x,
            trail_length,
            // Keep z scaling.
            current_trail_scale.z,
        ));
        Ok(())
    }
}
This code is pretty straightforward - at first we’re borrowing the node of the projectile, saving its global position in a variable and then casting a ray from the position and in the “look” direction of the projectile. Finally, we’re taking the first intersection from the list (it will be the closest one) and adjusting the trail’s length accordingly.
The final step is to assign the script and its variables in the editor. Run the editor, open bullet.rgs (or how your
prefab is called) prefab and select the root node, set Projectile script to it and set trail field to the Trail node.
It should look like so:
Gluing Everything Together
We have everything ready for final tuning - in this section of the tutorial we’ll finish putting everything together and
will have a fully functioning weapon. Let’s start from our weapon prefab, we need to “inform” it about the projectile
prefab we’ve just made. Open the m4.rgs prefab of our weapon and find projectile field in the Weapon script there.
Now find the bullet.rgs prefab of the projectile and drag’n’drop it onto the projectile field to set the value of it:
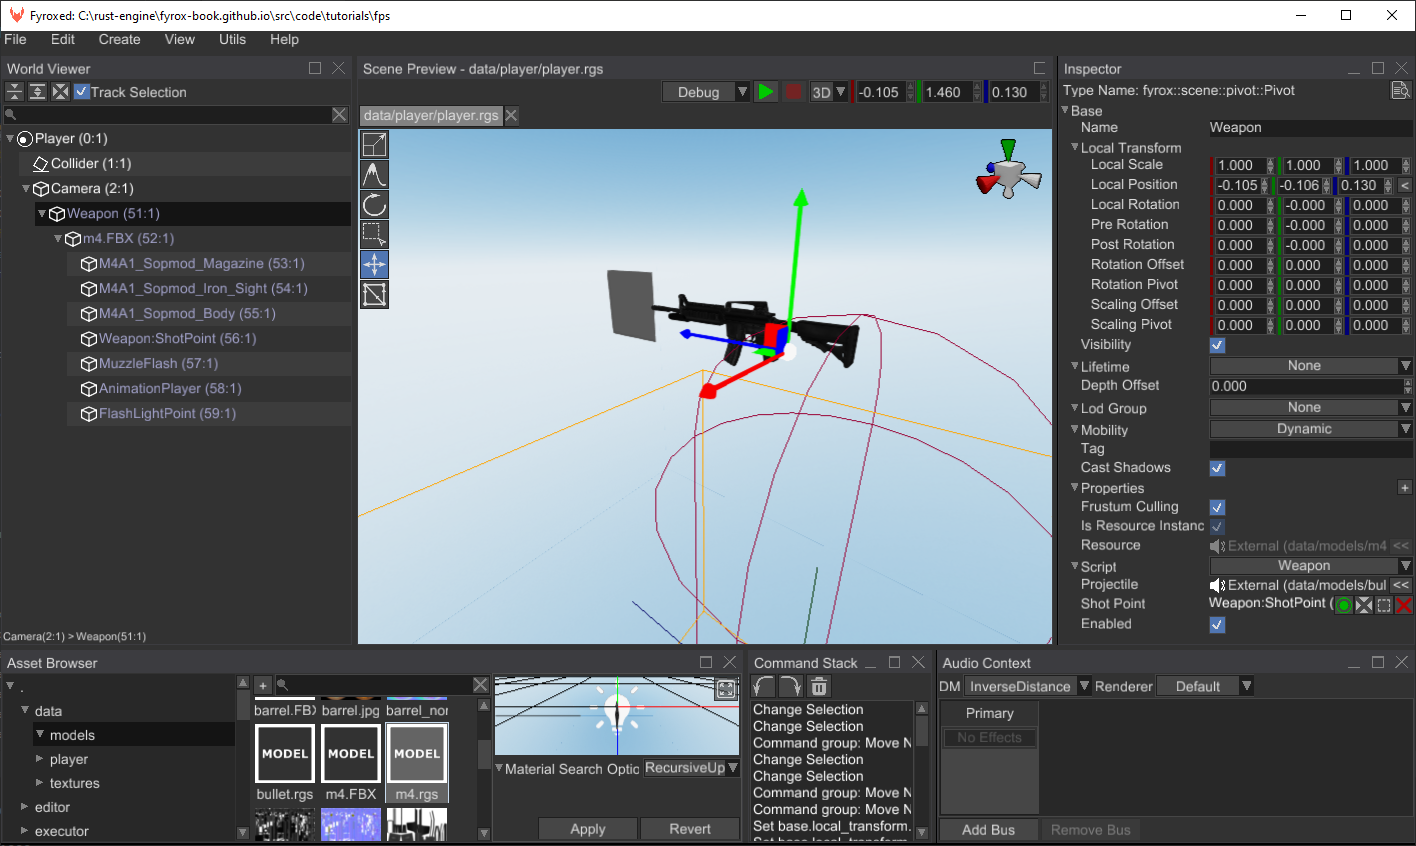
The last step is to add the weapon to the player. Open the player.rgs prefab and find the m4.rgs prefab in the
Asset Browser, instantiate it in the scene and make it a child of the camera node. Overall it should look like this:
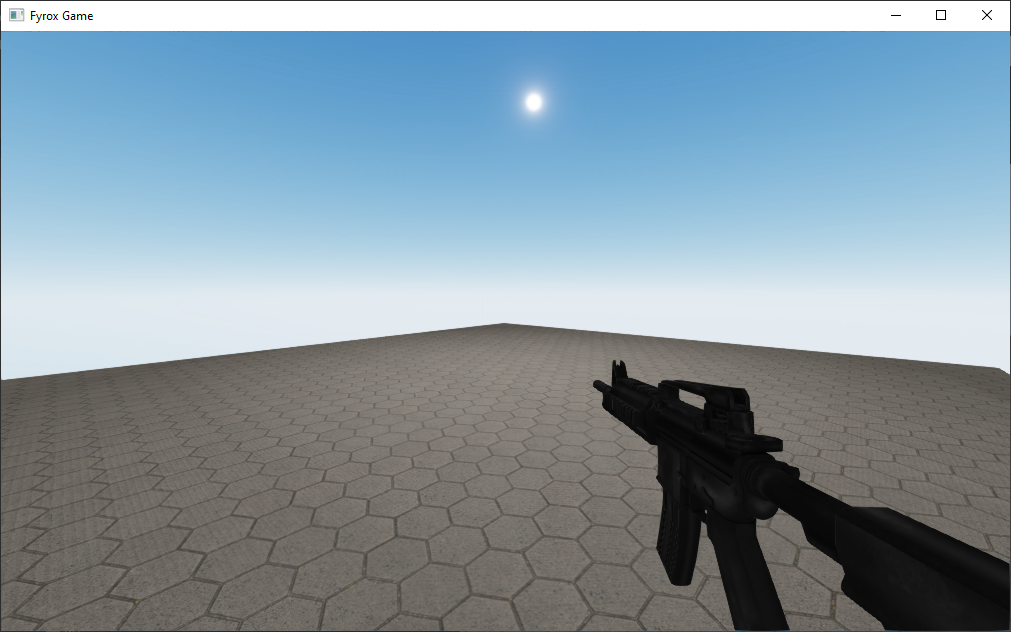
We almost finished our final preparations, you can even open scene.rgs and hit Play and see the weapon in game:
However, it won’t shoot just yet - we need to send a message to the weapon for it to shoot. To do that, at first, we
need to know to which weapon we’ll send a request to shoot. It is very easy to do by using weapon’s node handle. Add
the following field to the Player struct:
#![allow(unused)]
fn main() {
    current_weapon: InheritableVariable<Handle<Node>>,
}
We’ll send a request to shoot in reaction to left mouse button clicks. To do that, go to player.rs and add the
following code to the on_os_event:
#![allow(unused)]
fn main() {
        if let Event::WindowEvent {
            event:
                WindowEvent::MouseInput {
                    state,
                    button: MouseButton::Left,
                    ..
                },
            ..
        } = event
        {
            self.shoot = *state == ElementState::Pressed;
        }
}
And the following code to the on_update:
#![allow(unused)]
fn main() {
        if self.shoot {
            ctx.message_sender
                .send_to_target(*self.current_weapon, ShootWeaponMessage {});
        }
}
The last step is to assign the handle to the current weapon in the player’s prefab. Open the player.rgs prefab in
the editor and in the Player script find the Current Weapon field and assign to the Weapon node like so:
Run the game, and you should be able to shoot from the weapon, but it shoots way too fast. Let’s make the weapon to
shoot with desired interval while we’re holding the mouse button. Add the two timer variables to the Weapon struct:
#![allow(unused)]
fn main() {
    shot_interval: InheritableVariable<f32>,

    #[reflect(hidden)]
    shot_timer: f32,
}
The shot_timer variable will be used to measure time between shots and the shot_interval will set the
desired period of shooting (in seconds). We’ll handle one of these variables in on_update method:
#![allow(unused)]
fn main() {
    fn on_update(&mut self, context: &mut ScriptContext) -> GameResult {
        self.shot_timer -= context.dt;
        Ok(())
    }
}
This code is very simple - it just decreases the timer and that’s all. Now let’s add a new condition to the
on_message method right after if message.downcast_ref::<ShootWeaponMessage>().is_some() { line:
#![allow(unused)]
fn main() {
            if self.shot_timer >= 0.0 {
                return Ok(());
            }
            // Reset the timer, this way the next shot cannot be done earlier than the interval.
            self.shot_timer = *self.shot_interval;
}
Open the m4.rgs prefab in the editor and set the interval in the Weapon script to 0.1. Run the game and the
weapon should shoot less fast.
Bells and Whistles
We can improve overall feeling of our weapon by adding various effects.
Trail Dissolving
Our shot trails disappear instantly and this looks unnatural. It can be fixed very easy by using animations.
Read the docs about the animation editor first to get familiar with it.
Open the bullet.rgs prefab, add Animation Player node to the prefab and open the animation editor.
Add a new track that binds to the alpha channel of the color of the trail’s material:
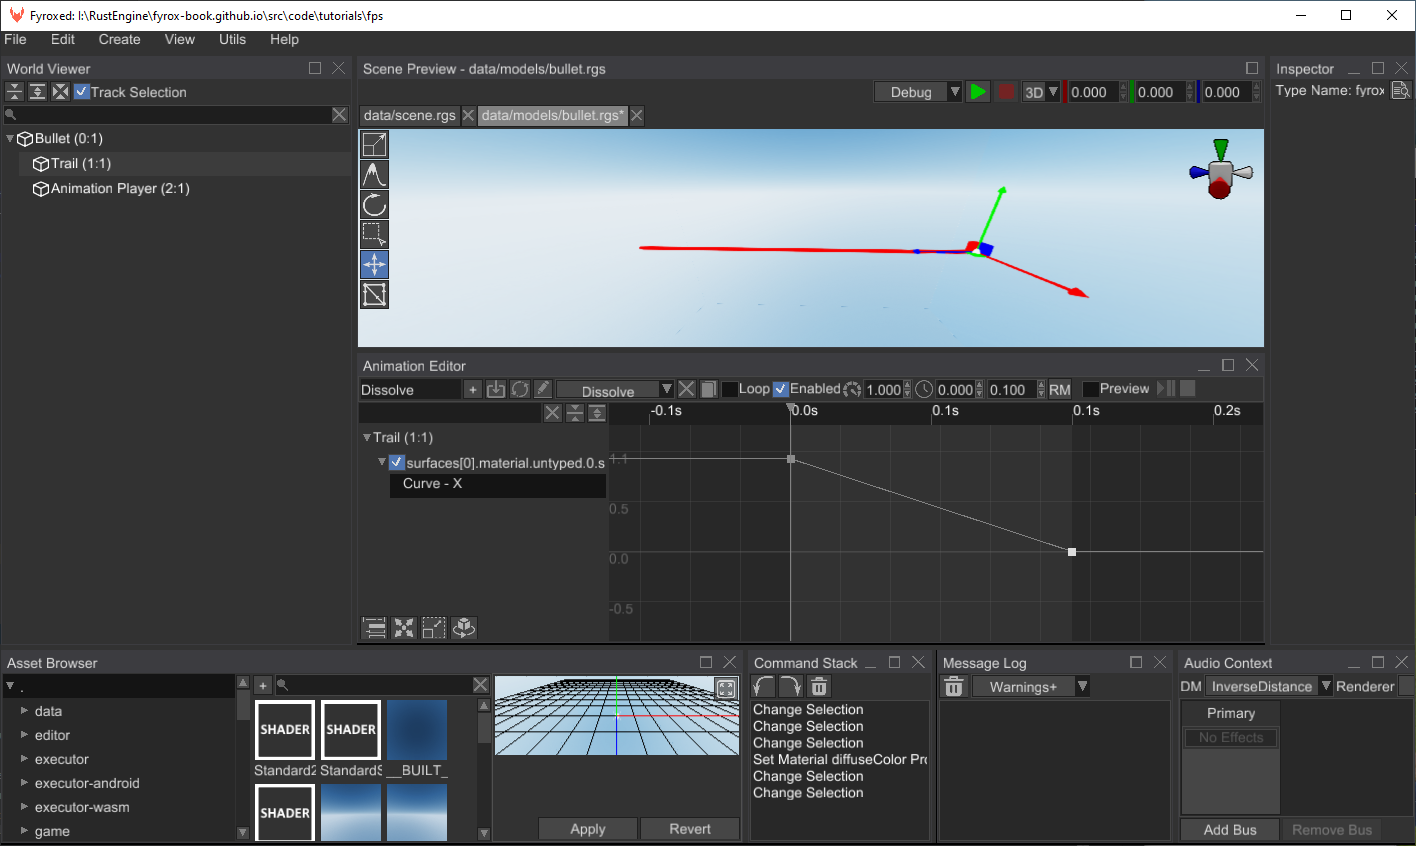
Also, make sure the Unique Material check box is checked in the material property of the trail’s mesh. Otherwise,
all trails will share the same material and once the animation is finished, you won’t see the trail anymore.
Run the game and shot trails should disappear smoothly.
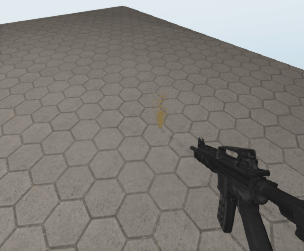
Impact Effects
Right now our projectiles does not interact with world, we can improve that by creating sparks effect
at the point of impact. Download this pre-made effect and unzip it in data/effects folder.
Add the following field to the Projectile struct:
#![allow(unused)]
fn main() {
    impact_effect: InheritableVariable<Option<ModelResource>>,
}
This is a “link” to particle effect, that we’ll spawn at the impact position. Let’s add this code to the end
of on_start of impl ScriptTrait for Projectile:
#![allow(unused)]
fn main() {
        if let Some(intersection) = intersections.first() {
            if let Some(effect) = self.impact_effect.as_ref() {
                effect.instantiate_at(
                    ctx.scene,
                    intersection.position.coords,
                    math::vector_to_quat(intersection.normal),
                );
            }
        }
}
The last thing we need to do is to assign Impact Effect property in bullet.rgs to the pre-made effect.
Run the game, and you should see something like this when shooting:
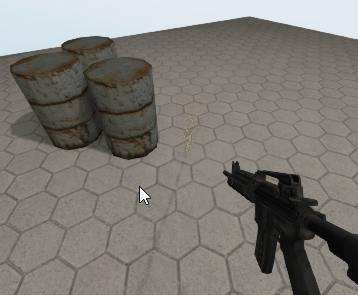
World Interaction
In this section we’ll add an ability to push physical objects by shooting. All we need to do is to add the
following code to at the end of on_start of impl ScriptTrait for Projectile:
#![allow(unused)]
fn main() {
        if let Some(intersection) = intersections.first() {
            let collider = ctx.scene.graph.try_get(intersection.collider)?;
            let rigid_body_handle = collider.parent();
            let rigid_body = ctx
                .scene
                .graph
                .try_get_mut_of_type::<RigidBody>(rigid_body_handle)?;

            if let Some(force_dir) =
                (intersection.position.coords - this_node_position).try_normalize(f32::EPSILON)
            {
                let force = force_dir.scale(200.0);

                rigid_body.apply_force_at_point(force, intersection.position.coords);
                rigid_body.wake_up();
            }
        }
}
This code is very straightforward: at first, we’re taking the closest intersection and by using its info about collider taking a reference to the rigid body we’ve just hit by the ray. Next, we’re applying force at the point of impact, which will push the rigid body.
To check how it works, unzip this prefab to data/models and add some instances of it to the scene.rgs
and run the game. You should see something like this:
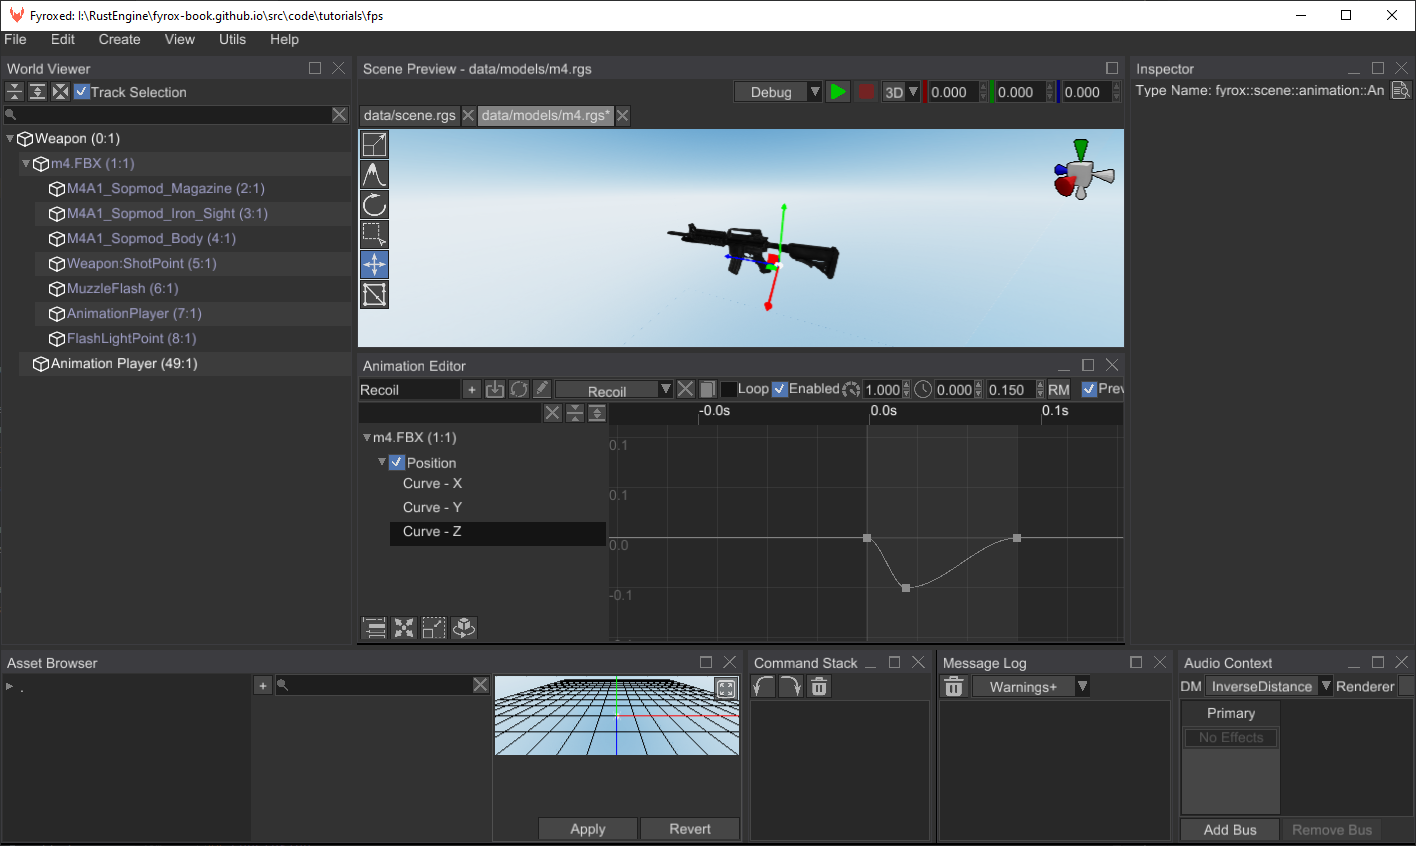
Recoil
The final improvement that we could do is to add a recoil to our weapon. We’ll use animation for that, like
we did for trails. Instead of animation the color, we’ll animation position of the weapon
model. Open m4.rgs prefab, add an animation player, create a new animation, add a binding to Position
property of m4.FBX node with the following parameters:
Now we need a way to enable this animation when shooting, to do that we need to know a handle of the animation
player in the weapon script. Let’s add it to the Weapon struct:
#![allow(unused)]
fn main() {
    animation_player: InheritableVariable<Handle<AnimationPlayer>>,
}
Add the following code to the on_message in weapon.rs, right after the shooting condition (if self.shot_timer >= 0.0 { ...):
#![allow(unused)]
fn main() {
            let animation_player = ctx
                .scene
                .graph
                .try_get_mut::<AnimationPlayer>(*self.animation_player)?;

            if let Some(animation) = animation_player
                .animations_mut()
                .get_value_mut_silent()
                .iter_mut()
                .next()
            {
                animation.rewind();
                animation.set_enabled(true);
            }

}
Run the game, and you should see something like this when shooting:
Conclusion
In this tutorial part we’ve added weapons that can shoot projectiles, which in their turn can interact with the environment.