Bots and AI
In the previous we’ve added weapons and projectiles, but we still do not have anything to shoot at. In this tutorial part we’ll add bots with simple AI:
Bot Prefab
Let’s start by zombie 3D model and animations for it, grab it from here and unpack into
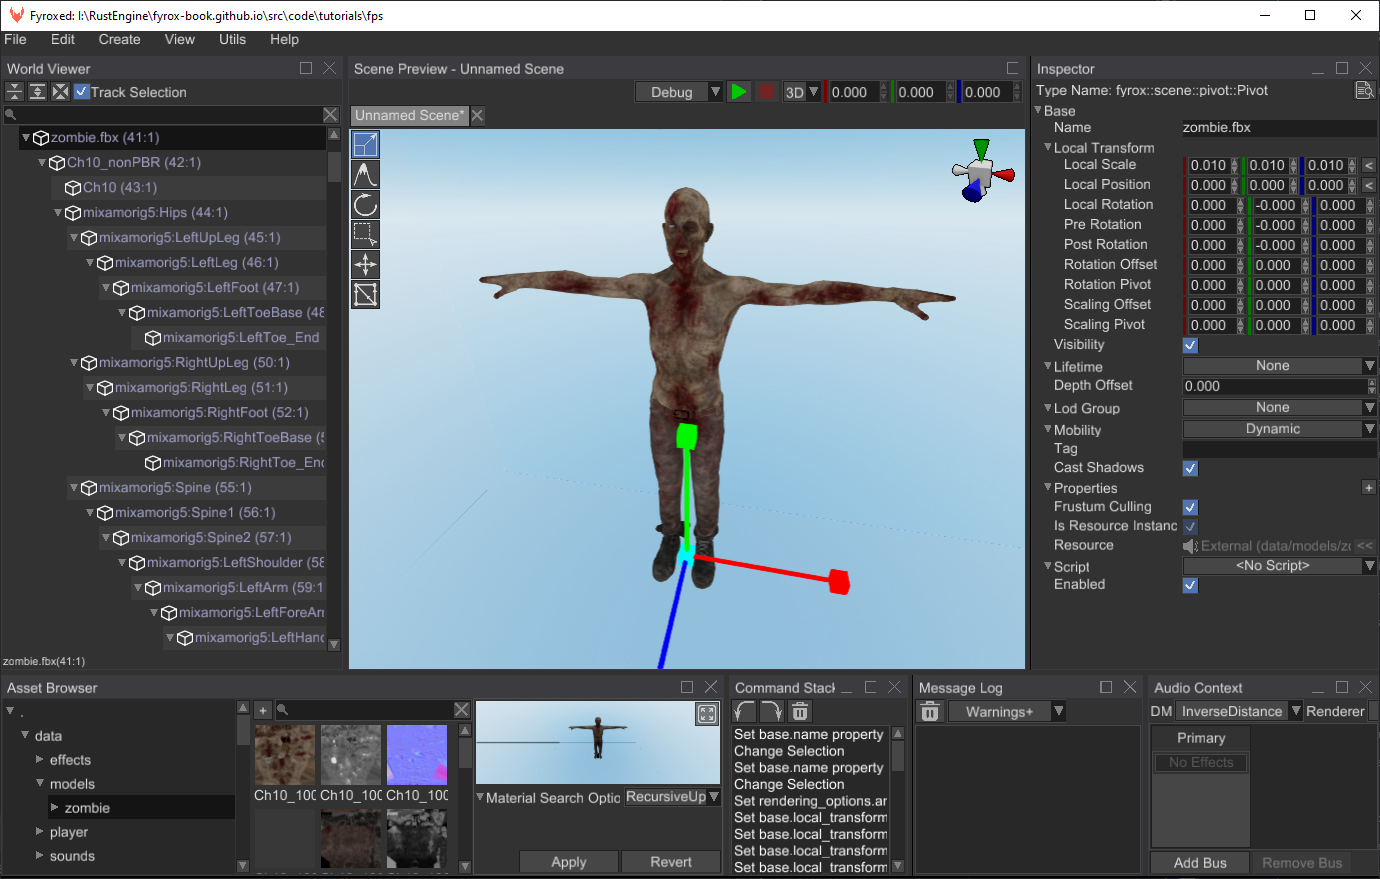
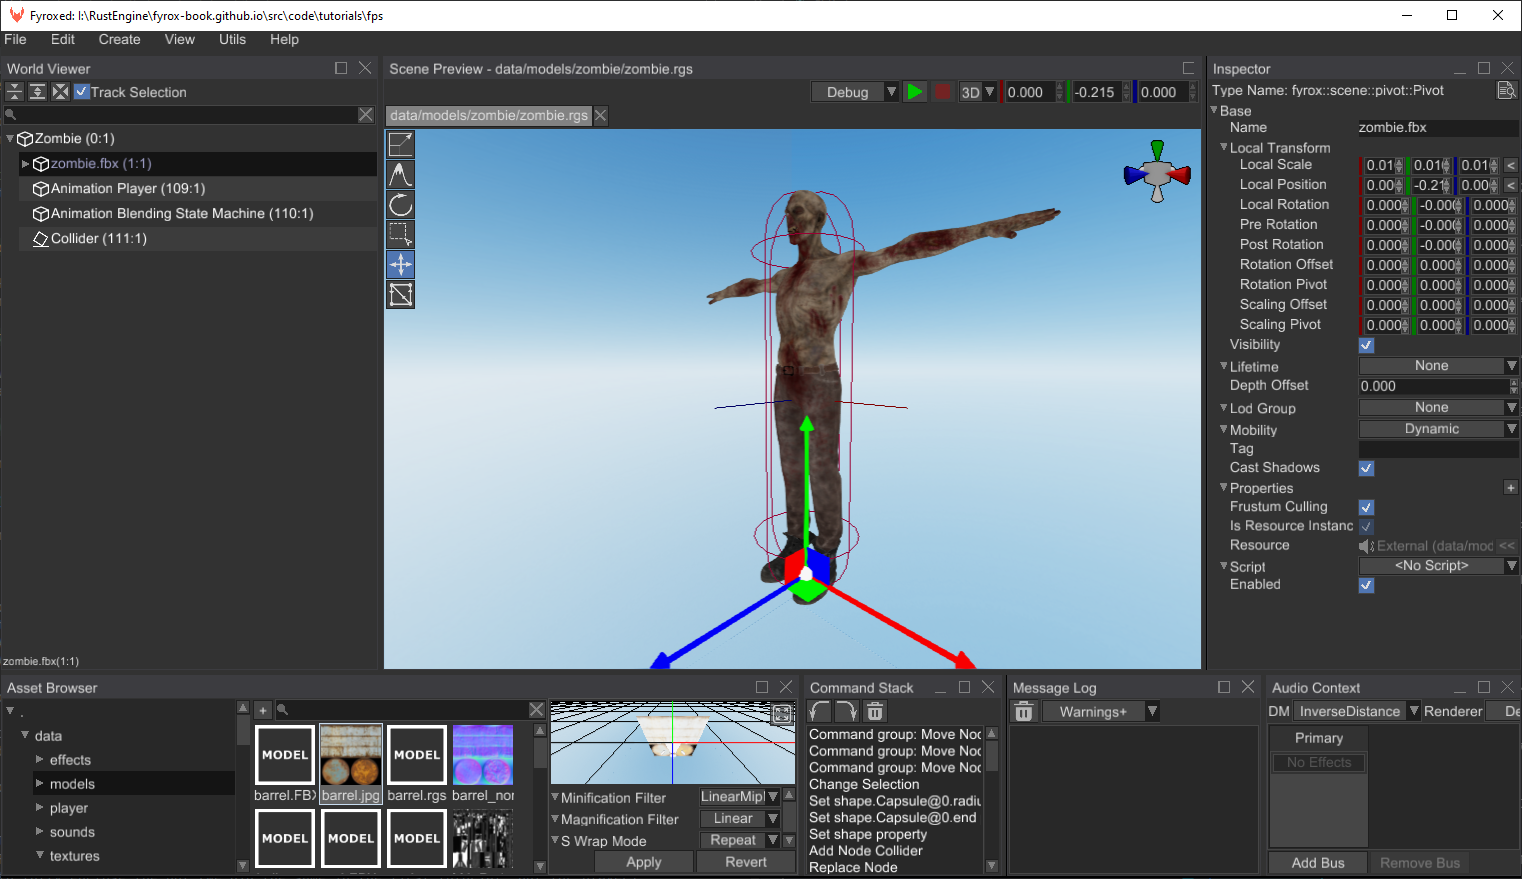
data/models/zombie folder. Open the editor and create zombie.rgs scene. Instantiate a zombie.FBX 3D model
in the scene and make sure it is located at (0, 0, 0) coordinates. Scale it down to have 0.01 scale in both axes.
You should get something like this:
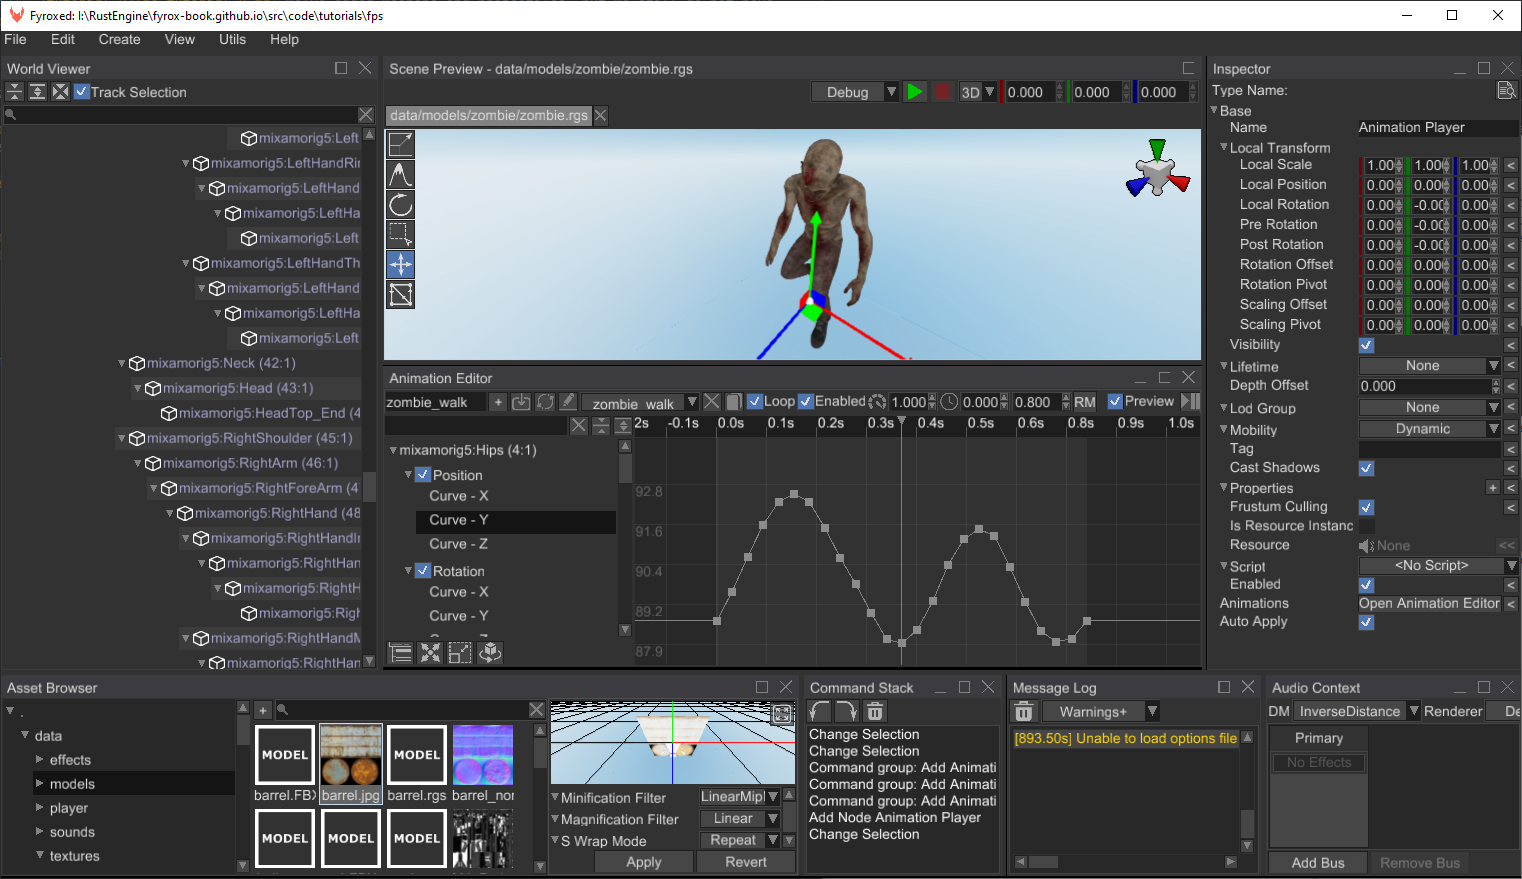
Next thing that we’ll add is animations. Create a new Animation Player scene node, open the animation editor
and add three animations (use this chapter to learn how to
do this) - zombie_attack, zombie_idle, zombie_running. You should get something like this:
Do not forget to disable looping for zombie_attack animation, otherwise our zombie will attack infinitely.
Also, make sure to set up the root motion for the zombie_running animation, read
this chapter for more info. Root motion will allow us to get
nice animation of movement, which will also serve as a source velocity for our bot.
You can select each animation from the list and see how it plays by clicking the “Preview” check box at the toolbar. Animations by their own are not very useful for us, because our bot can be in multiple states in the game:
- Idle - when there’s no one around and the bot is just standing still; looking for potential targets.
- Run - when the bot spotted someone and walks towards it.
- Attack - when the bot is close enough to a target and can attack it.
We need to somehow manage all these states and do smooth transition between the states. Fyrox has a special tool for this called animation blending state machine (ABSM). Let’s create a new ABSM scene node and add the three states mentioned above (if you don’t know how - read this chapter):
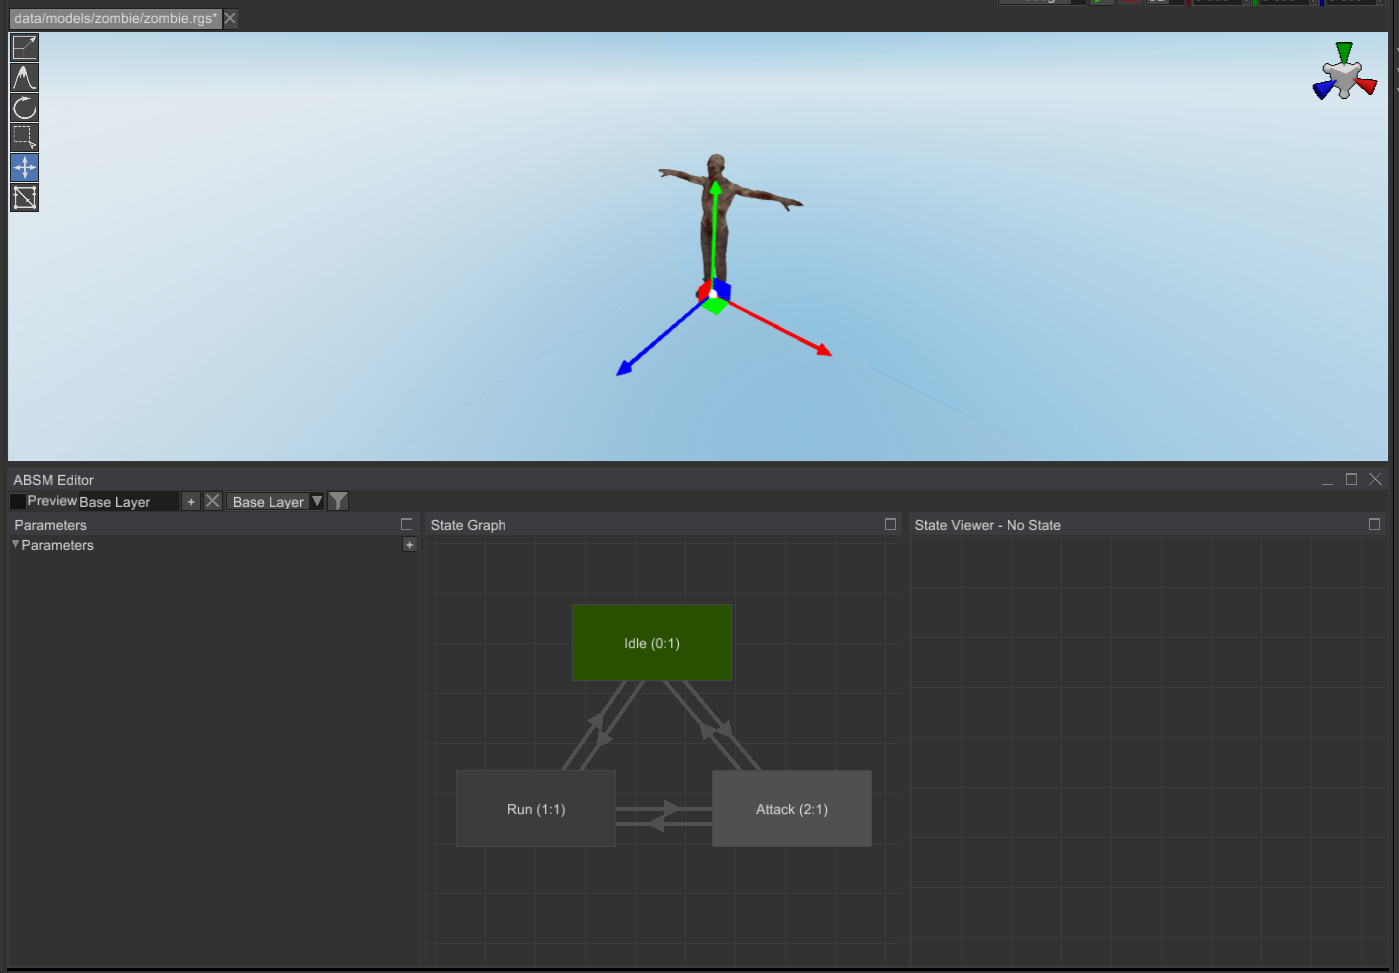
Connect them with bidirectional transitions and set transition time for them to 0.3s. Select the Animation Blending
State Machine node and assign Animation Player property in the Inspector.
Now add Play Animation pose node for each of the states (double-click on a state, right-click, Play Animation)
and set an appropriate animation from the list in the inspector. For example, for Idle state it could look
like this:
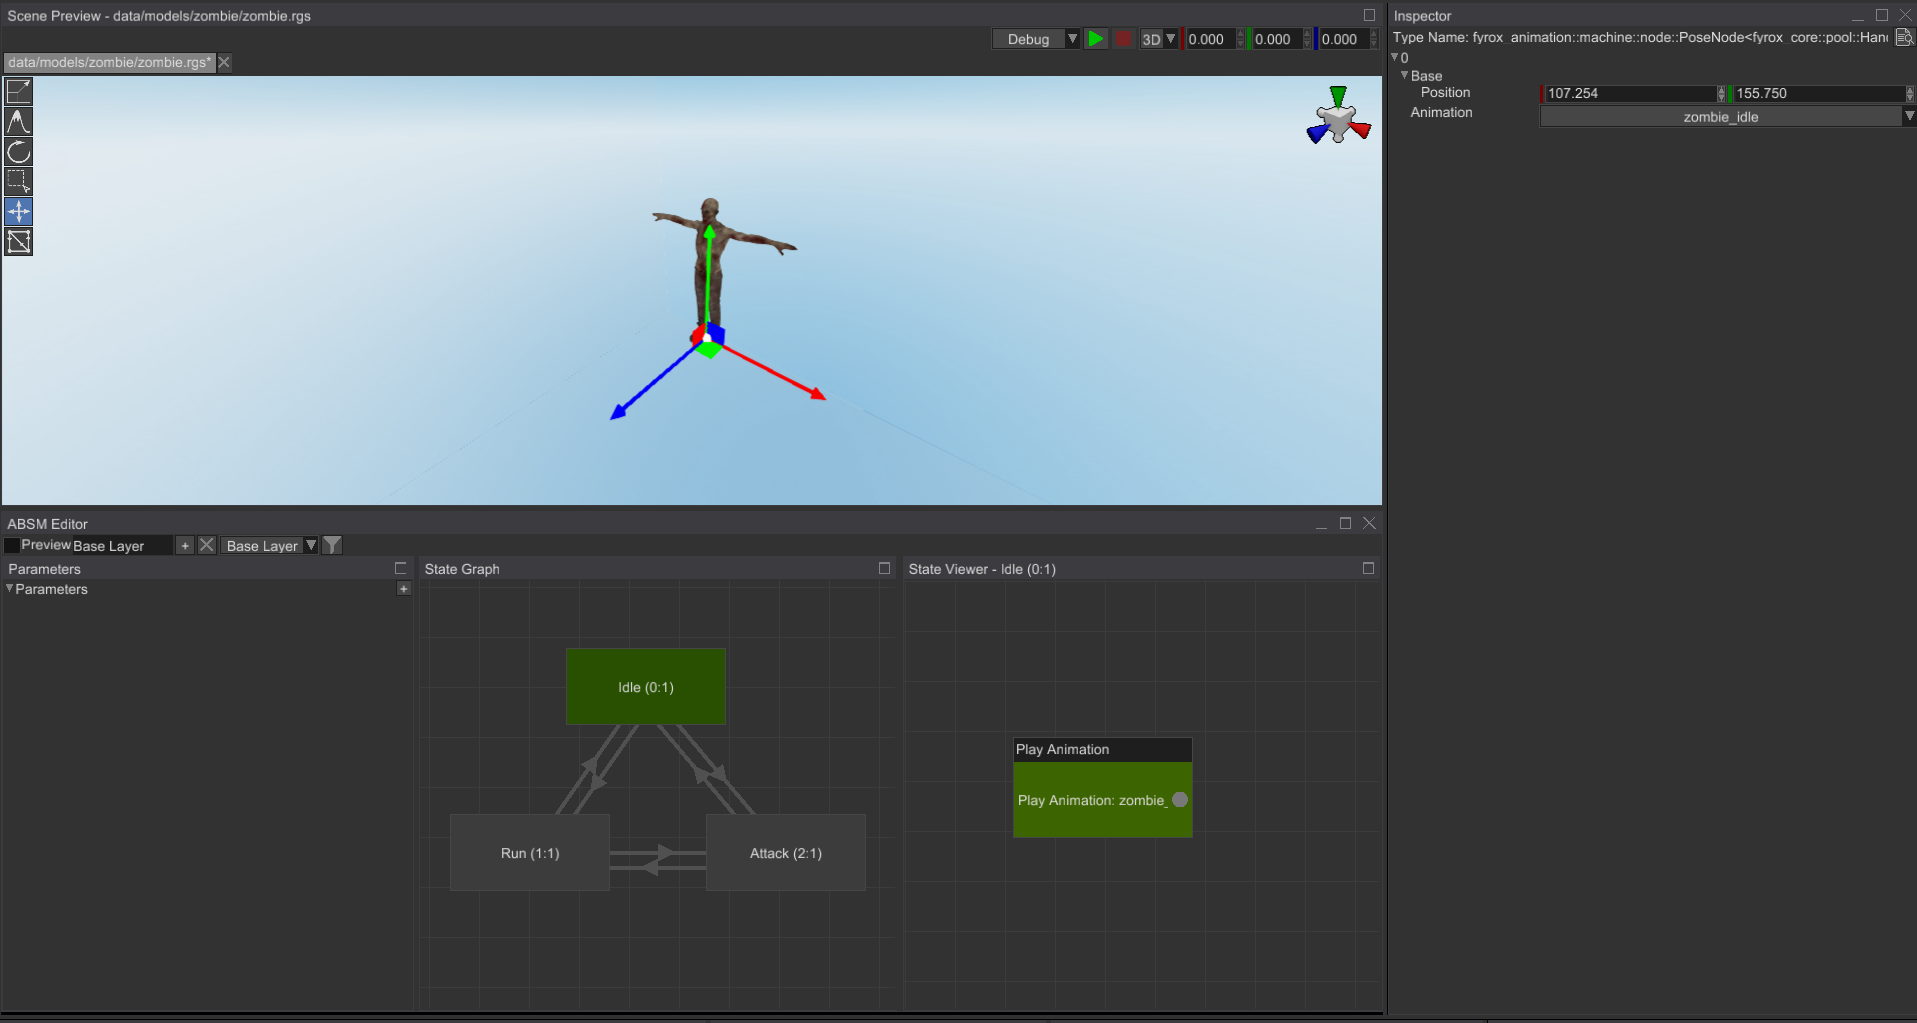
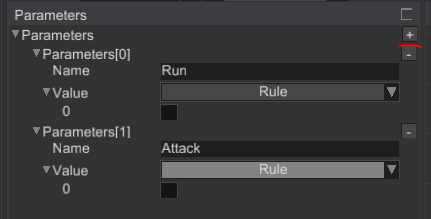
Click Preview check box, and you should see the bot with Idle animation playing. Let’s add two parameters
that will be used for transitions:
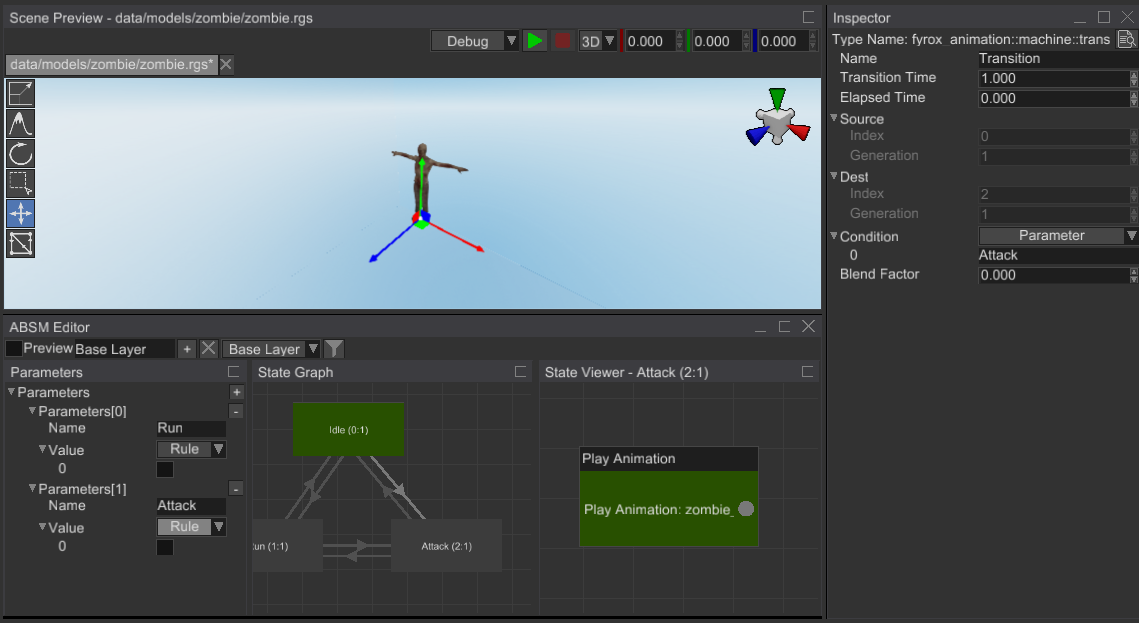
All we need to do now is to thoroughly set these variables in all six transitions. Select the Idle -> Attack
transition and in the Inspector find Condition property and type in Attack parameter name:
For the opposite transition you need to add almost the same, but with additional Not computational node:
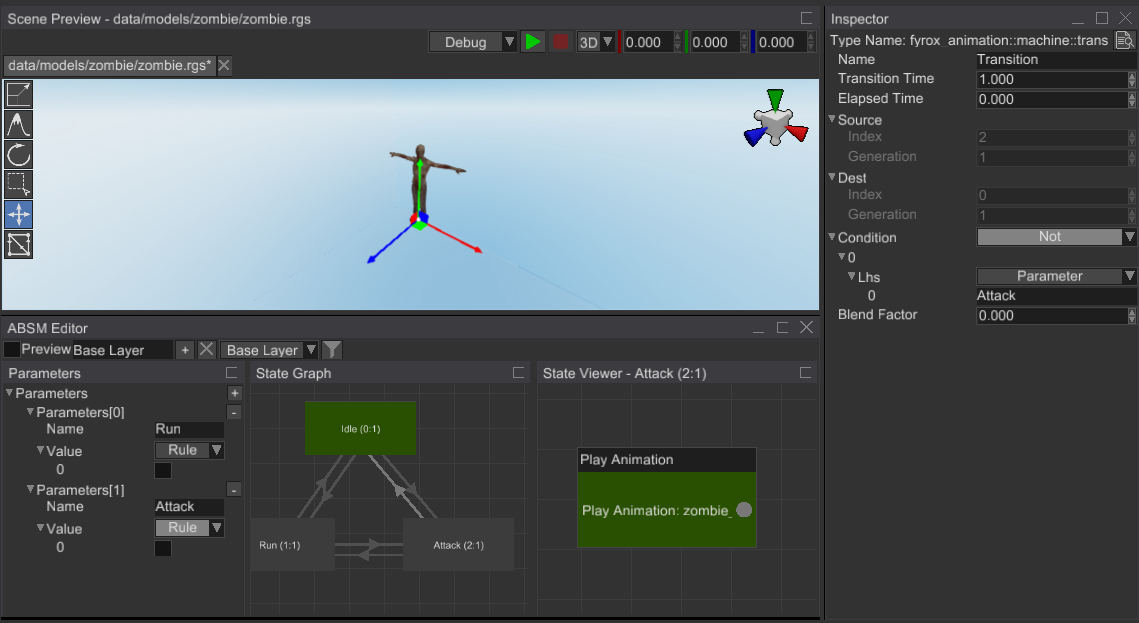
Do the same for the rest of four transitions, all six transitions should have these values set:
Idle -> Attack- Parameter(Attack)Attack -> Idle- Not(Parameter(Attack))Idle -> Run- And(Parameter(Run), Not(Parameter(Attack)))Run -> Idle- Not(Parameter(Run))Run -> Attack- And(Parameter(Run), Parameter(Attack))Attack -> Run- And(Parameter(Run), Not(Parameter(Attack)))
Click Preview and click on some parameters, you should see transitions between states.
You may probably notice that there’s something off with Attack state, sometimes it enters it in mid-attack
state. This happens because the attack animation could be in arbitrary play time. It could be fixed by adding
a Rewind Animation action when entering Attack state. Select the Attack state, find On Enter Actions in
the Inspector and add a new action by clicking + button, select Rewind Animation and select zombie_attack
from the list.
Great, now we have all animations working, and now we can add a physical capsule for the bot, so it won’t fall through the ground. Replace the root node of the prefab with a Rigid Body, add a capsule collider child node to it, adjust its size to fully enclose the bot (we did the same in the first tutorial, but for player):
Do not forget to disable rotations for the rigid body (X/Y/Z Rotation Locked properties must be checked) and
disable sleeping for it (uncheck Can Sleep). For now, our prefab is more or less finished. As usual, we need to
write some code, that will drive the bot.
Code
Add a new script using the following command:
fyrox-template script --name=bot
Add this module to the lib.rs module as we did in the previous tutorials. Register the bot in the register
method like so:
#![allow(unused)]
fn main() {
        context
            .serialization_context
            .script_constructors
            .add::<Bot>("Bot");
}
At first, our bot needs an ability “to see”. In games such ability can be represented by a simple frustum with
its top at the head of the bot and the base oriented forward. We can construct such frustum from a pair of
matrices - view and projection. After that the frustum can be used for simple frustum-point intersection check.
We’ll check if the player’s position intersects with the bot’s viewing frustum and if so, the bot will start
chasing the player. On to the code we go, add the following field to the Bot struct:
#![allow(unused)]
fn main() {
    #[visit(skip)]
    #[reflect(hidden)]
    frustum: Frustum,
}
To construct the frustum, add the following code somewhere in the bot.rs:
#![allow(unused)]
fn main() {
    fn update_frustum(
        &mut self,
        position: Vector3<f32>,
        look_vector: Vector3<f32>,
        up_vector: Vector3<f32>,
        max_observing_distance: f32,
    ) {
        // Calculate an average head position.
        let head_pos = position + Vector3::new(0.0, 0.4, 0.0);
        let look_at = head_pos + look_vector;

        // View matrix is constructed using three parameters - observer position, target point,
        // and an up vector (usually it is just (0,1,0) vector).
        let view_matrix =
            Matrix4::look_at_rh(&Point3::from(head_pos), &Point3::from(look_at), &up_vector);

        // Build the perspective projection matrix.
        let projection_matrix = Matrix4::new_perspective(
            // Aspect ratio
            16.0 / 9.0,
            // Field of view of the bot
            90.0f32.to_radians(),
            0.1,
            max_observing_distance,
        );
        self.frustum =
            Frustum::from_view_projection_matrix(projection_matrix * view_matrix).unwrap();
    }
}
We’ll call this method every frame to keep the frustum updated with the current location and orientation of
the bot. Add the following code to the on_update method:
#![allow(unused)]
fn main() {
        let rigid_body = ctx
            .scene
            .graph
            .try_get_mut_of_type::<RigidBody>(ctx.handle)?;
        let position = rigid_body.global_position();
        let up_vector = rigid_body.up_vector();
        let look_vector = rigid_body.look_vector();

        // Update the viewing frustum.
        self.update_frustum(position, look_vector, up_vector, 20.0);

}
Now we need to check if the player’s position intersects with the frustum. Add the following code at the beginning
of on_update:
#![allow(unused)]
fn main() {
        // Look for targets only if we don't have one.
        if self.target.is_none() {
            for (handle, node) in ctx.scene.graph.pair_iter() {
                if node.has_script::<Player>()
                    && self.frustum.is_contains_point(node.global_position())
                {
                    self.target = handle;
                    break;
                }
            }
        }

        // A helper flag, that tells the bot that it is close enough to a target for melee
        // attack.
        let close_to_target = ctx
            .scene
            .graph
            .try_get(self.target)
            .map_or(false, |target| {
                target
                    .global_position()
                    .metric_distance(&ctx.scene.graph[ctx.handle].global_position())
                    < 1.25
            });
}
In this code we’re iterating over the all available scene nodes and check if a node has Player script and
if the node’s position intersects with the bot’s frustum. If so, we’re remembering this node as a target.
Do not forget to add this code to the Bot struct:
#![allow(unused)]
fn main() {
    #[visit(skip)]
    #[reflect(hidden)]
    target: Handle<Node>,
}
Now we need to add movement for the bot, we’ll use root motion
for that. Root motion will be extracted from the animation blending state machine we’ve made earlier. Let’s
add this code to the Bot struct:
#![allow(unused)]
fn main() {
    absm: InheritableVariable<Handle<AnimationBlendingStateMachine>>,
    model_root: InheritableVariable<Handle<Node>>,
}
The first field will hold a handle to the ABSM and the second - a handle to the 3D model root. We’ll assign these field later, now we need to add the code that will extract velocity vector for the bot movement and apply this vector to the rigid body of the bot:
#![allow(unused)]
fn main() {
        let model_transform = ctx
            .scene
            .graph
            .try_get(*self.model_root)?
            .global_transform();

        let mut velocity = Vector3::default();
        let state_machine = ctx.scene.graph.try_get_mut(*self.absm)?;


}
At first, we’re getting current world-space transform of the 3D model’s root and saving it into a local variable.
Then we’re borrowing the ABSM we’ve made earlier and extracting the root motion offset vector. As a final step
we’re scaling it by 1.0 / dt factor to convert it to velocity. This final velocity vector needs to be set to
the rigid body of the bot. To do that, add the following code at the end of the last if statement (where
we’re borrowing the rigid body):
#![allow(unused)]
fn main() {
        let y_vel = rigid_body.lin_vel().y;
        rigid_body.set_lin_vel(Vector3::new(velocity.x, y_vel, velocity.z));
}
Next we need to somehow inform the ABSM about the current state of the bot. Remember that we have two parameters in the ABSM? We need to set them from the code, it could be done like so:
#![allow(unused)]
fn main() {
let y_vel = rigid_body.lin_vel().y;
rigid_body.set_lin_vel(Vector3::new(velocity.x, y_vel, velocity.z));
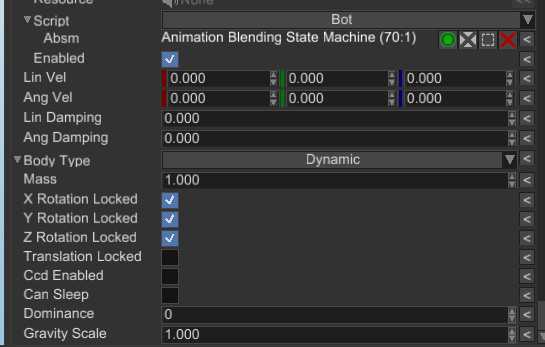
}Now it’s time to do small adjustments to our prefabs. Open the zombie.rgs prefab and assign the Bot
script to the root node of the prefab, set its properties like so:
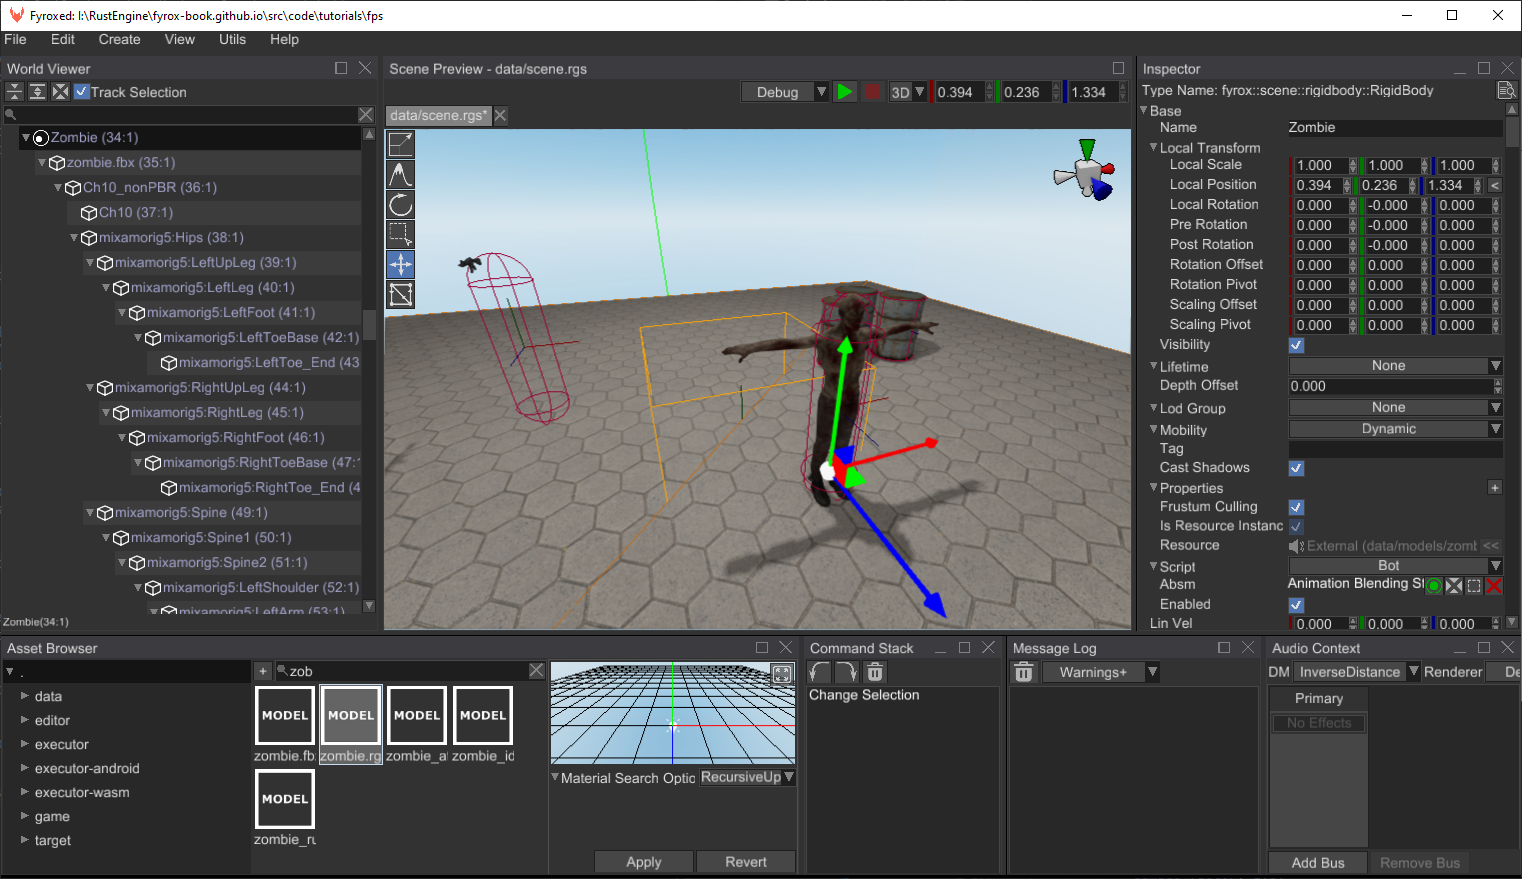
Open the scene.rgs, find the zombie.rgs prefab in the asset browser and instantiate it in the scene:
Now you can run the game and walk in front of the bot, it should run, but it runs straight and does not follow
the target (the player). Let’s fix that. At first, we need to calculate an angle between a target and the bot.
We’ll calculate it using atan2 trigonometric function, add the following code somewhere in on_update:
#![allow(unused)]
fn main() {
        let angle_to_target = ctx.scene.graph.try_get(self.target).ok().map(|target| {
            let self_position = ctx.scene.graph[ctx.handle].global_position();
            let look_dir = target.global_position() - self_position;
            look_dir.x.atan2(look_dir.z)
        });
}
This code calculates a vector between the bot’s position and a target, and then calculates an angle in XZ plane,
using atan2(x, z) trigonometric function. Let’s use this angle, add the following code the end of the
last if statement (where we’re borrowing the rigid body):
#![allow(unused)]
fn main() {
        if let Some(angle) = angle_to_target {
            rigid_body
                .local_transform_mut()
                .set_rotation(UnitQuaternion::from_axis_angle(&Vector3::y_axis(), angle));
        }
}
This code is trivial - we’re making a rotation quaternion, that rotates the bot around Y axis using the angle we’ve calculated.
Run the game and the bot should follow you as long as it sees you:
Conclusion
In this tutorial part we’ve added bots with animation and simple AI. In the next tutorial we’ll add an ability to kill the bots.