Camera node
Camera is a special scene node that allows you to "look" at your scene from any point and with any orientation. Currently, the engine supports only perspective cameras, which could be represented as a frustum volume. Everything that "intersects" with the frustum will be rendered.

How to create
An instance of camera node could be created using CameraBuilder:
#![allow(unused)]
fn main() {
extern crate fyrox;
use fyrox::{
    core::pool::Handle,
    scene::{base::BaseBuilder, camera::CameraBuilder, node::Node, Scene},
};

fn create_camera(scene: &mut Scene) -> Handle<Node> {
    CameraBuilder::new(BaseBuilder::new())
        // Set some properties.
        .with_fov(80.0f32.to_radians())
        .with_z_far(256.0)
        .build(&mut scene.graph)
}
}
Orientation and position should be set in BaseBuilder as usual.
Projection modes
Projection mode defines how your scene will look like after rendering, there are two projection modes available.
Perspective
Perspective projection makes distant objects smaller and parallel lines converging when using it, it is the most common projection type for 3D games. By default, each camera uses perspective projection. It's defined by three parameters that describes frustum volume:
- Field of view angle
- Near clipping plane location
- Far clipping plane location
Here is a simple example of how to create a camera with perspective projection:
#![allow(unused)]
fn main() {
extern crate fyrox;
use fyrox::{
    core::pool::Handle,
    scene::{
        base::BaseBuilder,
        camera::{CameraBuilder, PerspectiveProjection, Projection},
        graph::Graph,
        node::Node,
    },
};
fn create_perspective_camera(graph: &mut Graph) -> Handle<Node> {
    CameraBuilder::new(BaseBuilder::new())
        .with_projection(Projection::Perspective(PerspectiveProjection {
            // Keep in mind that field of view expressed in radians!
            fov: 60.0f32.to_radians(),
            z_near: 0.025,
            z_far: 1024.0,
        }))
        .build(graph)
}
}
Orthographic
Orthographic projection prevents parallel lines from converging, it does not affect object size with distance. If you're making 2D games or isometric 3D games, this is the projection mode you're looking for. Orthographic projection defined by three parameters:
- Vertical Size
- Near Clipping Plane
- Far Clipping Plane
Vertical size defines how large the "box" will be in vertical axis, horizontal size is derived from vertical size by multiplying vertical size with aspect ratio.
Here is a simple example of how to create a camera with orthographic projection:
#![allow(unused)]
fn main() {
extern crate fyrox;
use fyrox::{
    core::pool::Handle,
    scene::{
        base::BaseBuilder,
        camera::{CameraBuilder, OrthographicProjection, Projection},
        graph::Graph,
        node::Node,
    },
};
fn create_perspective_camera(graph: &mut Graph) -> Handle<Node> {
    CameraBuilder::new(BaseBuilder::new())
        .with_projection(Projection::Orthographic(OrthographicProjection {
            vertical_size: 5.0,
            z_near: 0.025,
            z_far: 1024.0,
        }))
        .build(graph)
}
}
Performance
Each camera forces engine to re-render scene one more time, which can be very resource-intensive (both CPU and GPU) operation.
To reduce GPU load, try to keep the Far Clipping Plane at lowest possible values. For example, if you're making a game with closed environment (lots of corridors, small rooms, etc.) set the Far clipping Plane to max possible distance that can be "seen" in your game - if the largest thing is a corridor, then set the Far clipping Plane to slightly exceed the length. This will force the engine to clip everything that is out of bounds and do not draw such objects.
Skybox
Outdoor scenes usually have distant objects that can't be reached, these can be mountains, sky, distant forest, etc. such objects can be pre-rendered and then applied to a huge cube around camera, it will always be rendered first and will be the background of your scene. To create a Skybox and set it to a camera, you can use the following code:
#![allow(unused)]
fn main() {
extern crate fyrox;
use fyrox::{
    core::{futures::executor::block_on, pool::Handle},
    asset::manager::ResourceManager,
    resource::texture::{Texture, TextureWrapMode},
    scene::{
        base::BaseBuilder,
        camera::{CameraBuilder, SkyBox, SkyBoxBuilder},
        node::Node,
        Scene,
    },
};

async fn create_skybox(resource_manager: ResourceManager) -> SkyBox {
    // Load skybox textures in parallel.
    let (front, back, left, right, top, bottom) = fyrox::core::futures::join!(
        resource_manager.request::<Texture, _>("path/to/front.jpg"),
        resource_manager.request::<Texture, _>("path/to/back.jpg"),
        resource_manager.request::<Texture, _>("path/to/left.jpg"),
        resource_manager.request::<Texture, _>("path/to/right.jpg"),
        resource_manager.request::<Texture, _>("path/to/up.jpg"),
        resource_manager.request::<Texture, _>("path/to/down.jpg")
    );

    // Unwrap everything.
    let skybox = SkyBoxBuilder {
        front: Some(front.unwrap()),
        back: Some(back.unwrap()),
        left: Some(left.unwrap()),
        right: Some(right.unwrap()),
        top: Some(top.unwrap()),
        bottom: Some(bottom.unwrap()),
    }
    .build()
    .unwrap();

    // Set S and T coordinate wrap mode, ClampToEdge will remove any possible seams on edges
    // of the skybox.
    let skybox_texture = skybox.cubemap().unwrap();
    let mut data = skybox_texture.data_ref();
    data.set_s_wrap_mode(TextureWrapMode::ClampToEdge);
    data.set_t_wrap_mode(TextureWrapMode::ClampToEdge);

    skybox
}

fn create_camera(scene: &mut Scene, resource_manager: ResourceManager) -> Handle<Node> {
    CameraBuilder::new(BaseBuilder::new())
        .with_skybox(block_on(create_skybox(resource_manager)))
        .build(&mut scene.graph)
}
}
Color grading look-up tables
Color grading Look-Up Tables (LUT) allows you to transform color space of your frame. Probably everyone saw the famous "mexican" movie effect when everything becomes yellow-ish when action takes place in Mexico, this is done via color grading LUT effect. When used wisely, it can significantly improve perception of your scene.
Here is the same scene having no color correction along with another case that has "mexico" color correction:
| Scene | Look-up-table |
|---|---|
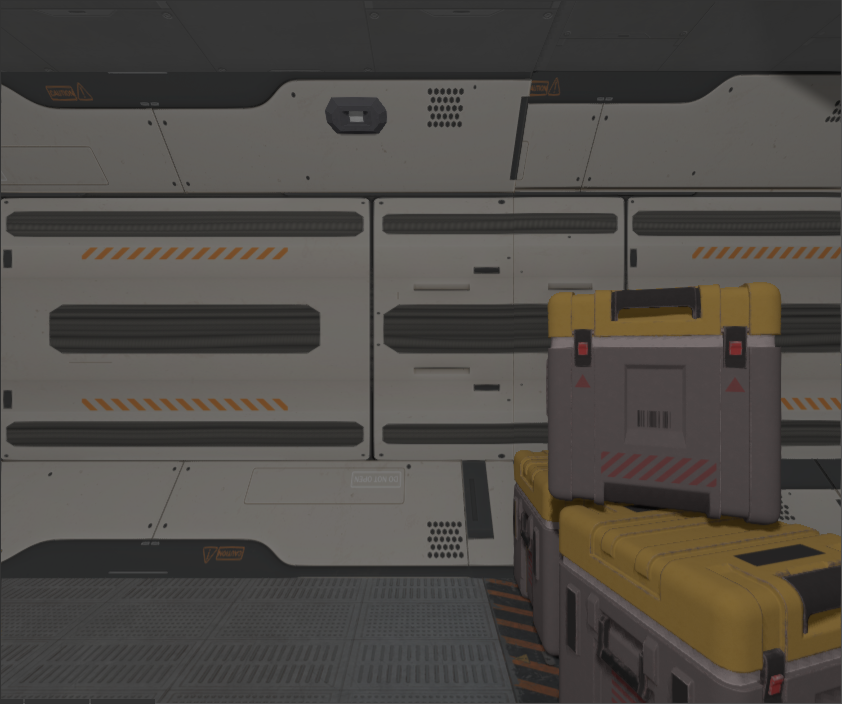 |  |
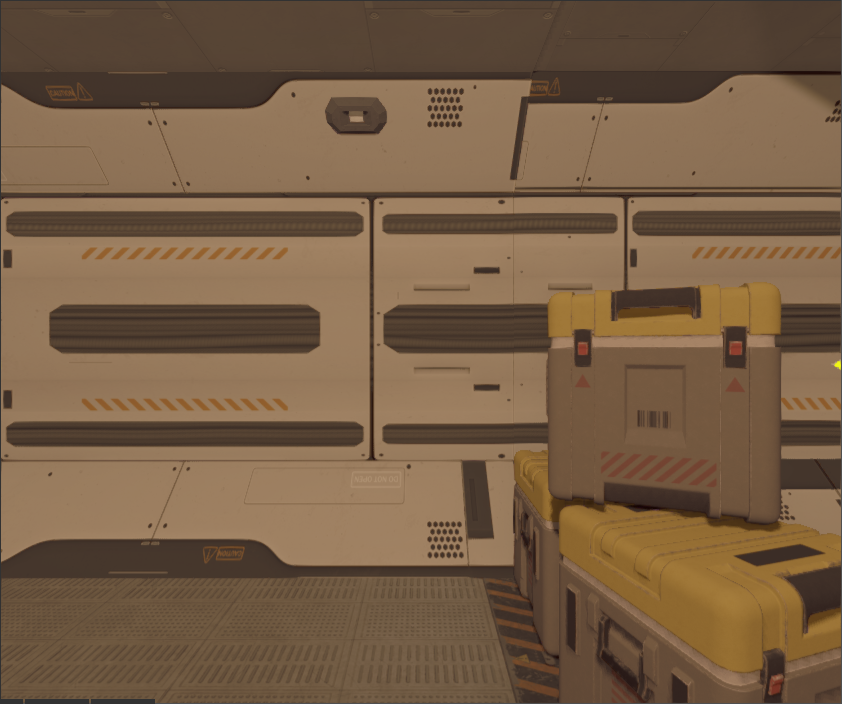 |  |
To use color grading LUT you could do something like this:
#![allow(unused)]
fn main() {
extern crate fyrox;
use fyrox::{
    core::{futures::executor::block_on, pool::Handle},
    asset::manager::ResourceManager, resource::texture::Texture,
    scene::{
        base::BaseBuilder,
        camera::{CameraBuilder, ColorGradingLut},
        node::Node,
        Scene,
    },
};

fn create_camera_with_lut(
    scene: &mut Scene,
    resource_manager: ResourceManager,
) -> Handle<Node> {
    CameraBuilder::new(BaseBuilder::new())
        .with_color_grading_enabled(true)
        .with_color_grading_lut(
            block_on(ColorGradingLut::new(
                resource_manager.request::<Texture, _>("path/to/lut.jpg"),
            ))
            .unwrap(),
        )
        .build(&mut scene.graph)
}
}
Picking
In some games you may need to do mouse picking of objects in your scene. To do that, at first you need to somehow convert
a point on the screen to ray in the world. Camera has make_ray method exactly for that purpose:
#![allow(unused)]
fn main() {
extern crate fyrox;
use fyrox::{
    core::{algebra::Vector2, math::ray::Ray},
    renderer::Renderer,
    scene::camera::Camera,
};

fn make_picking_ray(camera: &Camera, point: Vector2<f32>, renderer: &Renderer) -> Ray {
    camera.make_ray(point, renderer.get_frame_bounds())
}
}
The ray then can be used to perform a ray cast over physics entities. This is the simplest way of camera picking, and you should prefer it most of the time.
Advanced picking
Important: The following picking method is for advanced engine users only, if you don't know the math you should not use it.
If you know the math and don't want to create physical entities, you can use this ray to perform manual ray intersection check:
#![allow(unused)]
fn main() {
extern crate fyrox;
use fyrox::{
    core::{
        algebra::Vector3,
        algebra::{Matrix4, Point3},
        math::TriangleDefinition,
        math::{ray::Ray, Vector3Ext},
    },
    scene::node::Node,
    scene::mesh::{
        buffer::{VertexAttributeUsage, VertexReadTrait},
        surface::SurfaceData,
        Mesh,
    },
};

fn read_vertex_position(data: &SurfaceData, i: u32) -> Option<Vector3<f32>> {
    data.vertex_buffer
        .get(i as usize)
        .and_then(|v| v.read_3_f32(VertexAttributeUsage::Position).ok())
}

fn transform_vertex(vertex: Vector3<f32>, transform: &Matrix4<f32>) -> Vector3<f32> {
    transform.transform_point(&Point3::from(vertex)).coords
}

fn read_triangle(
    data: &SurfaceData,
    triangle: &TriangleDefinition,
    transform: &Matrix4<f32>,
) -> Option<[Vector3<f32>; 3]> {
    let a = transform_vertex(read_vertex_position(data, triangle[0])?, transform);
    let b = transform_vertex(read_vertex_position(data, triangle[1])?, transform);
    let c = transform_vertex(read_vertex_position(data, triangle[2])?, transform);
    Some([a, b, c])
}

pub fn precise_ray_test(
    node: &Node,
    ray: &Ray,
    ignore_back_faces: bool,
) -> Option<(f32, Vector3<f32>)> {
    let mut closest_distance = f32::MAX;
    let mut closest_point = None;

    if let Some(mesh) = node.query_component_ref::<Mesh>() {
        let transform = mesh.global_transform();

        for surface in mesh.surfaces().iter() {
            let data = surface.data();
            let data = data.lock();

            for triangle in data
                .geometry_buffer
                .iter()
                .filter_map(|t| read_triangle(&data, t, &transform))
            {
                if ignore_back_faces {
                    // If normal of the triangle is facing in the same direction as ray's direction,
                    // then we skip such triangle.
                    let normal =
                        (triangle[1] - triangle[0]).cross(&(triangle[2] - triangle[0]));
                    if normal.dot(&ray.dir) >= 0.0 {
                        continue;
                    }
                }

                if let Some(pt) = ray.triangle_intersection_point(&triangle) {
                    let distance = ray.origin.sqr_distance(&pt);

                    if distance < closest_distance {
                        closest_distance = distance;
                        closest_point = Some(pt);
                    }
                }
            }
        }
    }

    closest_point.map(|pt| (closest_distance, pt))
}
}
precise_ray_test is what you need, it performs precise intersection check with geometry of a mesh node. It returns a
tuple of the closest distance and the closest intersection point.
Exposure and HDR
(WIP)